Friday, July 6, 2018

Battletech terrain - new thoughts

Hi everyone,

Following up on our work to support the Battletech campaign we've kicked off (link to that blog post) -- we have had some new thoughts on Battletech terrain and wanted to share those - and also how things are shaping up :)

1) We do like the *BIG* battle-mat with smaller hexes.

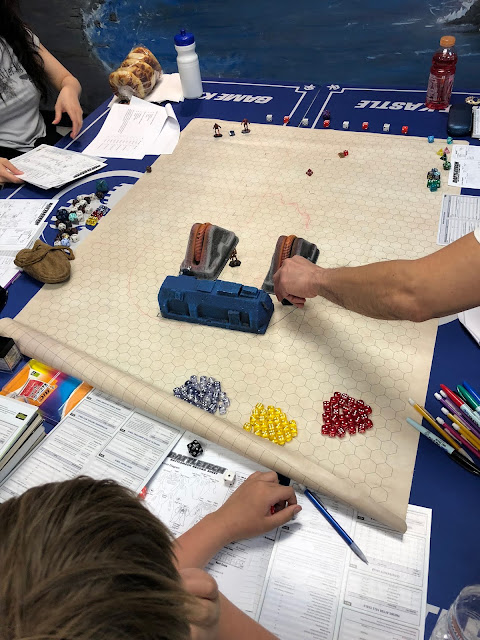
 Have enjoyed using the big battle mat which has smaller hexes.
  • The big battle-mat with the smaller hexes is nice because a) it's really fast to set up (i.e., you un-roll it!); b) you can write on it with over-head projector markers; c) it creates a sense of very long range.
  • The down side is that it isn't pretty to look at -- going to have to think about ways to add color and terrain to it.
  • When it creates a very long range sense, it allows for our *lance members* who like to fire from long range to have a drop zone which is outside of enemy firing range.  When we use the cardboard maps which come with the table top game (which do look cool) -- then we have to use quite a few of them to create that same effect.
  • We are thinking that what we may do is use the Heroscape tiles in the center of the battle mat -- and have a bit of a discontinuity in scale.  Outside the Heroscape tiles - you're on battle mat scale ("super long range") and you count and move with the smaller battle mat hexes.  Once inside the Heroscape tile space -- the tiles are larger and the more details throes of combat come into sharper focus.
2) Pink foam terrain was fun - but lots of work to make

Here is our first set of pink foam 3-D structures to use with the standard box set maps.
  • It was a lot of fun to have terrain which matched those cardboard map sheets.  And, we even made a HUGE one to use with the map which came with one of the expansions.
Here's a battle we run where we used our little pink-foam mountains and our really big pink-foam mountain.  It is fun when there are such steep angles to consider.  Brings up the question of whether or not to use the Pythagorean Theorem!!
  • But, these are a lot of work to create.  And, you can't really change them much once you have created them.  And, (especially in the case of the huge one) they are not convenient to store when the game is over!!
3) Excited about Heroscapes hex tiles!  ...Is it Hero Scapes?  Or Heroscapes?  Either way they are cool :)
  • We've been watching these on eBay for a long time - but they've always seemed a bit expensive.  Then, this past weekend we managed to get a set of them at the swap meet at our Mountain View Game Kastle store!
 The big huge trees are a little bit goofy - but the hexagon pieces are very cool!
  • We realized that they were a bit rough (a little bit too bright?) in terms of colors - so have been working on painting them.
The unpainted ones are the bright colored ones toward the bottom of the photo.  We started by priming them all brown - then added some sand and green colors.  More work to do....
  • Here's a quick look at them so far, with 'Mechs in operation.
Here are our painted Hero Scapes so far.  Think we'll do some dry brushing and add some other effects to the brownish look we have going so far....

4) Going to try mounting 3D printed structures and trees on to Hero Scapes tiles
  • Over the past couple of years we've 3D printed some structures from Thingiverse which were tagged as Battletech scale.  The only issue is that it's pretty easy to scoot them around on the board by accident.  Thinking that we could mount these to those really flat tiles (maybe the red ones) which were part of the tub of Heroscapes.
Here's a nuclear power plant we printed up.  This is one of the things we could mount onto a set of 3-4 of the flat Heroscape hexes.

This turbine was one of the first things we ever 3D printed.  It looks cool - but it slides around very easily.  Prime candidate for mounted on the hexes.

Thursday, July 5, 2018

Kicking off a Battletech Campaign

Hi everyone,

After enjoying a fun Starfinder campaign with several friends, we've decided to kick off a Battletech RPG Campaign.

But, after having played Battletech RPG for a while here and there (mostly trying the tabletop rules along with the Mechwarrior 2.0 RPG rules), we've decided to roll some innovations into our RPG sessions:

1) Make the RPG like the new computer game

We have been wondering if we can make our RPG sessions more like the computer game by Harebrained Schemes ??  Seems a worth goal!
  • Several of us in the campaign are *really* enjoying the new turn-based Battletech game created by Harebrained Schemes http://battletechgame.com/  And, there are several rules and order-of-play mechanisms in the HBS version which we would like to try to emulate in our table-top RPG sessions.
2) Use 3039 - border of House Kurita and House Davion
  • It sort of came about somewhat through discussion.  We didn't want the classic Clans vs. Inner Sphere battles -- but we did want the chance of some 3050 technology entering into our sessions.
  • Our thinking is that we can always have 3050 type things showing up here and there (as highly prized items or mechs) as prototypes which are under test.
3) Have fun with terrain
  • We've learned over time that this makes RPG sessions much more fun.  Easier to visualize the crazy things which could happen if there are fun terrain models.
  • In the past we've used made pink foam pieces to match our terrain maps.  Going forward going to try to do better than even that.
4) Use Obsidian Portal for game tracking and forums and such

Here's a quick example of our Obsidian Portal page - with one of our characters - Bob Bobson - call-sign "Buckaroo".
  • Heard about this from our friend Mr. J -- who uses it for his D&D sessions.  After a little bit of practice, it is extremely handy!  https://www.obsidianportal.com/
  • It's already been lots of fun to include character back-stories there - along with NPCs.  Going to take a little bit of practice, but feel this will help all of us to keep track better.
  • Had previously been using Google Docs or Google Slides for this in Starfinder.  This seems like an easier method :)
5) Create mechanisms to make the table top turn-based experience faster and more aligned with story telling.  Have some ideas on this already :)
  • We had seen how some people have used a d6 to mark walking, running or jumping of 'Mechs.  Not sure whether this is a new idea or an old idea - but we are thinking to mark the points of "evasion" with the d6's.
  • Also, one of our players proposed that we figure out a way to make all dice rolling simultaneous.  We think we may have this sorted out!!
We'll post more soon on how it is going!

Thursday, March 22, 2018

Pop-o-matic Dice Roller for RPG (and making it more random)

Hi everyone :)

After our fun time "rebuilding" a dice-rolling tray using an old game we found in a thrift store, we've been thinking about other fun things we can create to have fun in our Battle Gaming sessions.

Here's a write-up of one recent idea....

Some of us may have seen the game Trouble.  It's the one where the d6 (classic die) is under a plastic bubble in the middle of the game board.  And, rather than having a chance to lose that die (you can't -- it's under the plastic), you push down on the bubble - there is a pop - and you release and the die is rolled.

It's the apply named "Pop-o-Matic" die roller!

Here's an example of the "Trouble" game we found -- with the Pop-o-Matic in the center.

Well, we got to thinking that it might be pretty fun to rebuild one of those using some other dice.  Or, maybe just cut that one out of the game board with our little band-saw and use it as is.

Then, we got to reading on line.  (We figured, of course we aren't the only ones to have thought of this - and how has it gone for other people?)

RANDOMNESS CONCERNS:

And, that's when we discovered that there are randomness concerns with the Pop-o-matic.  Mr. Jason Knight spells it out nicely in his blog post.

The bottom line issue is that if the d6 is starting with a 6 showing - it is not fully random which way it will be the next time.  Sort of like, because the die is trapped in the plastic bubble it's a bit more likely to come back down with the 6 still facing up.  And, a little bit less likely to flip over and come back down withe the 1 showing.  (The other four sides have a probability which is somewhere in the middle between these.)

Here's a link to Mr. Jason Knight's blog post:
http://blog.jasonknight.us/2013/07/statistical-trouble-with-trouble-board.html

The front page of Mr. Knight's post.

MAKING IT MORE RANDOM - SMALL DICE:

Well, we certainly didn't want to go to the trouble of making something which wasn't very random.  So, what to do.  An idea struck - use smaller dice!!

At first we were thinking to use some of our really-really-small d6's which we've accumulated over time.

But, then at a great swap meet at our Mountain View Game Kastle, we found a super-sale on little vials of very small RPG dice.

They seemed just about perfect.  So, we bought a few.  :)

Here's a look at our vials of little RPG dice!

Then, with our plan in place, we went ahead an cut out the Pop-o-Matics from the Trouble game board.  (We actually had gotten two for just a dollar or two - so we had one to spare in case we messed up.)

Here is our Pop-o-Matic after cutting one out of the Trouble game-board.

We trimmed up the Pop-o-Matic very carefully with the band-saw.  Then, we loaded it with our replacement for the d6.  It was a little bit tricky to hold the metal spring piece in place with the plastic bubble and get it all lined up - but we did manage :)

Our Pop-o-Matic with glue drying....

And, here we are gluing it back together.  As we've posted before - we used epoxy to make sure our rebuilt Pop-o-Matic wouldn't break apart.

Here's a link to our blog-post about the higher fracture toughness of epoxy - compared to super-glue:
http://battlegaming1.blogspot.com/2018/01/superglue-accelerator-carefully-and-not.html

And, with that, we have our finished product.  As you'll see below, we couldn't really decide which of the little vial of dice to put inside -- so we put in all of them.

And, that's pretty cool!  You swirl the Pop-o-Matic around (to create a random initial state in honor of Mr. Jason Knight) and then Pop! the dice - and you have a full set of random results!!

Here's a photo of our finished Pop-o-Matic :)

And, here's a link to our super-short video of us testing it out....
https://www.youtube.com/watch?v=HexIUI-KMwU

A super-short video of us testing out our Pop-o-Matic!

What next?  Maybe build another one with some other colors of little dice?  (We chose the purple ones we had because of the very nice color contrast.)  Or, maybe make one with very little d6's -- but five or six of them -- so that you have one Pop-o-Matic for games which have multiple d6's to roll.

Tuesday, January 16, 2018

Superglue accelerator (carefully) - and not so much epoxy

Hi everyone,

A quick blog post with updates on our feelings regarding Super glue vs. Epoxy -- now that we have discovered the existence of Super Glue Accelerators!

A few weeks ago, while playing our Starfinder Campaign - and working on the crazy idea of merging in Battletech 'mech fighting rules we got to talking about the table about glues - and bemoaning the reality (as we understood it) that only epoxy dealt well with metal models the likes of which you often need to use with Battletech.  Then, Mr. T. (one of our friends and Starfinder player) chimed in that we should consider using a super glue accelerator.  Don't recall what he suggested - something like "Zip It".

We were absolutely intrigued.  Is this the secret so many utilize to make superglue workable for them?  Is this what we have been missing?

Our superglue accelerator and super glue side-by-side with the old trusty epoxy bottles

Because, quite honestly, most of our experiences with superglue had been poor.  Either we couldn't get it to set; or we glued our fingers together; or what we did glue fell and broke into many pieces.

So, we asked more.  "Be careful you don't burn yourself, though!" cautioned Mr. T.  He went on to explain that the heat of reaction between the superglue and the accelerator released quite a bit of heat and that you could really burn your fingers.  He indicated that he had done so many times over the years.

Well, we had to try this out!  Asking at Game Kastle in Mountain View we learned that they had two such products on the shelf.  We picked out "Insta-Set" and headed home to try the stuff with one of our Battletech models (metal, of course).

First Experience

To try out the Insta-Set we figured we had better be careful!
  1. We used it as a two person operation.  One of us put down the super glue; the other of us did the holding of the parts; then person one set down the super glue and sprayed on the accelerator.  (So, the two were never close to each other.)
  2. We wore gloves.  (We were worried about the "blistering hot" comments we had gotten when we bought the Insta-Set.)
  3. We were prepared for really hot.  Used our needle nose pliers for some of the early piece holding.

The bottle of Insta-Set uses a pump-spray action.  It was a little tricky to manage in all angles.  The liquid is quite volatile.  The stain you see on our paper back we used to catch over-spray was gone within 15 minutes.

And, maybe those were quite good precautions.  First of all - we did learn just how hot the reaction can make things (quite hot - very easy to understand the burning risk!!)  Secondly - at one point a little bit of glue got onto a glove - and the spray hit that - and WOW! quite a hot feeling to the fingers inside of the glove.  The good news is that the hot, curing glue was not stuck to the fingers - and we were able to quickly rip the glove off and get the heat away from our skin!!!

[PS:  We also read some online forum posts with discussion of whether or not the accelerator materials are flammable.  One person reported nearly burning off their eyebrows testing this out with a lighter!  No need to repeat that experiment, we'd guess!!]

But, when all was said and done - it really, really worked.  We whipped a metal model of a Clan 'mech together in something like 5 or 10 minutes.  And, that my friends would have taken us hours or days or curing time with epoxy.

Our new and old trusty glue options with Battletech 'mechs in the background

Here are the two 'mechs we built up in 15-20 minutes.  Much, much faster than we could have done with epoxy alone.

We built up another 'mech - a Stalker - which we had as bits - and then did a few tests to see how well the super glue bonds were holding together.  Not too bad!  The model was pretty sturdy!

Our Battletech models posing with the super glue and accelerator

So, we certainly learned that the accelerator is truly useful product - though with hazards and requiring very careful use.

What's our net judgement?
  1. This stuff is great for working with metal models.  And, we're guessing it's not bad at all with resin either.
  2. Be careful - wear gloves.
  3. Be careful - store separately.  [We don't like thinking about what would happen if a bottle of one mixed with a bottle of the other.]
  4. If you do have a long time for curing and want something more sturdy - use epoxy :)
So, you may wonder why after all of that we'd vote for epoxy when it is convenient.  Well, it all comes down to *fracture toughness*.

Our feeling is that even with the accelerator (which does cure the super glue) you still end up with a material which is more brittle - has lower fracture toughness - than the polymer you end up with joining your parts when you use epoxy glues.

Here's a nice article talking in a bit more detail about the differences.  In their words, "Super Glue sets quickly and has a very low shearing strength while epoxy sets slowly and has good shear strength."

A set of curves for fracture toughness of materials.  Metals are up in the upper right.  Things like glass are toward the bottom.  We figure epoxy sits higher on a set of curves like this than super glue.

And, if you don't mind indulging the paint job which one of us (who is not so great at painting) managed, please check out our Ghazkull Thrakka.

Read more: Here's our original blog posting where we struggled with resin, model glue and superglue

We gave up trying model glue (wrong for resin, we learned!!) and super glue (we couldn't manage it) and put him together with epoxy.  And, yes, if you look hard at his joints, you find some globs of the stuff, which, while Orky do detract from the model's appearance.

Here is our Ghazghkull Thraka model.  Assembled with epoxy!

So, maybe what we'll do in the future is use a hybrid ??  Put metal and resin model together carefully with super glue and accelerator.  And, then add some epoxy where we feel the joint might be whacked if the model falls on the floor.  (And, yes, if anyone is wondering, our Ghazghkull has survived many drops from table to floor.)

Friday, January 12, 2018

Taking the Dakka Chugga to Warhammer World

Hi everyone,

A few months back we had a chance to make our first visit to Warhammer World.  And, we had taken our trusty Battle Gaming One Ork and Space Marine along to take a few photos.

[Here is a link to our post about "how to get there."]

But, we thought it would really be fun (if we were to visit again) to take our Ork Train to Warhammer World -- so that (at the very least) we could take some photos of the Ork Train on the very cool scenery there.

Taking the Dakka Chugga to Warhammer World

Well, as it would happen, we worked it out that we would take our family vacation in London this year -- so this June we did have another chance to visit Warhammer World.  This left us with  questions to work out:  What to take along; and how to pack it.

Of course we wanted to take our entire Ork Train (as we had done when we went to Las Vegas Open).  But... we had pretty nearly filled the car getting the Ork Train to Las Vegas -- that wouldn't work out for a trip by airplane.

So, we worked out priorities -- What to take along:

- Fork and Spork wanted to go along -- and they are relatively small -- so they were in.

- The Dakka Chugga (our tyranid body powered Ork steam engine) was our first Ork Train element -- so we wanted to take it along for certain.
 
- We wanted to take Da Pain Train (our Eldar-looted locomotive).  But, it is a bit fragile (as we had learned by the amount of glue work required after the LVO trip).  So, we decided it should stay at home.
 
- So, in terms of priorities, we decided that the next fun thing to take would be our Ork-Gangster passenger car -- along with the Nobs with their magnet boots.

How to pack?

A while back we took the Dakka Chugga to play against Matt at Miniwargaming.com.  That was a plane trip to Buffalo, then to Niagara Falls -- and then a drive to the Canadian side of the falls to reach Miniwargaming.  We took along all of Fork and Spork's Orks -- plus the Dakka Chugga.  But, at that time we didn't have all of the other cars.  So, we checked the Orks in checked baggage!!  But, we didn't feel good about doing that again this time -- especially since a full trans-Atlantic flight would include a lot more turbulence and jiggling of our 40K models.  (Here's a link to our past adventures getting to Miniwargaming.com)

So, we were determined to carry the Ork Train on board.  Luckily, we found a small carry-on bag which we could use to protect the Dakka Chugga pretty well.  We put the locomotive (which weighs the most) at the bottom -- with lots of bubble wrap -- and a towel wrapped around it.  We put the Tenda and the Ork Loota and Burna  car on top of that.  And, we placed Fork and Spork inside bubble wrap inside a hard plastic case on top off all of them.

The arrival in London went fine.  We were worried that our Orks might face some sort of immigration questioning (haha), but all went fine.

Here's the Dakka Chugga Ork Steam Engine and Tender safely in London

And, here are Fork (left) and Spork (center).  Some repair work to do on Spork's squig!

And, the Gansta-style Lootas and Burnas car made it safe and sound as well :)

Getting the Ork Train to Warhammer World once we were in London wasn't so bad.  We simply packed it back up into that roll-on bag and away we went on the train to Nottingham!

Then, when we arrived, what a treat.  There were a number of large new terrain pieces at Warhammer World!

After admiring them, we set up a few photos when players weren't using some of the cool layouts.  :)

We had a chance to have quite a few fun conversations.  Met people from lots of different places.  Great fun!

Here is the Dakka Chugga at Warhammer World!  We liked this photo because you catch the fortress background in the photo!

We really liked this terrain piece - took photos with the Ork Train in lots of precarious positions!

The Dakka Chugga posing :)

Fork and Spork supervising the progress of the Ork Train on the battlefield!

The Ork Train charging forward :)

More fun snaps with the Dakka Chugga!

And, one more....

We do fully confess to making some purchases.  Here the Ork Train stops at Forge World to make loot a few models for future expansions :)

Fork and Spork steam the Ork Train into the Forge World shop.  Looking for squigs and necron parts for looting....

And, of course, had to have lunch at Bugman's!

We enjoy lunch at Bugman's at Warhammer World with the Ork Train

The trip home?  Well, pretty much reverse course and do it all over again.  Went just fine.

Reflections on how to do it differently?  Well....  It sure would have been fun to take track and a power supply and have the Ork Train running under it's own power at Warhammer World.  ....Maybe next time!

Plus, next time, shouldn't we have the full train?  It'd be a pretty big suitcase - but would be lots of fun.

(Oh yeah, and maybe it's time for Fork and Spork to have bases which aren't bright green ??)

Saturday, December 9, 2017

Clean up the beach - make cool terrain!!

Hi everyone,


Here's our *Process Flow* of steps for taking Ocean Plastic from the beach to create Tabletop Gaming terrain!

Here's an interesting (and fun?) or at the very least positive idea for those of us who like the beach and like table top games!!

The beach on the Eastern Shore or Oahu.  Lots of plastic washed up onto the beach after days, weeks, months or years in the Pacific Ocean.

1) Go to the beach (when you can - or ask a friend who is going)
2) Collect beach plastic (which doesn't belong there anyway)
3) Make terrain and bases out of the weathered plastic pieces

Over the recent holiday we had the chance to visit Hawaiian island Oahu.  It was lots of fun.  But, sadly there was a lot more trash-plastic on the beach than when one of us was a bit younger and we visited the same location.  Realization for us that the concerns about ocean plastic are very real.

Here's a pile of several of the pieces of plastic we hauled to the trash can.  Some had been in the water a long time - others much less time.

What to do?  Well, we thought we'd do our share and put plastic in the trash can.  We may have filled a trash can up over our several days there.  And, the good news is that the stretch of beach we worked on did seem to stay a bit cleaner -- meaning the more plastic didn't wash up again over night.  So, it does seem possible to attack the problem.

Here are several of the plastic pieces we saved and brought home.  The water created fascinating textures.  This is what got us thinking about using them for modeling.

And, while we were at it, interesting discovery.  Time in salt water does amazing things to plastic!!  Need plastic which looks like cobblestones or ancient concrete?  You're all set -- just get some beach plastic.

Not sure, but we think this was a piece of a shoe....

We ended up using some to make Sci-fi looking bases for some of our Starfinder Minis.  And, thinking of lots of uses for Ork structures and terrain for 40K.

This piece is more weird - very orange inside.  We wondered if it might have been part of a ball because of its curvature??  We liked how it looked a lot like cracked stone.

We also shared some with our good friend Mr. S at Game Kastle -- knowing that he is a big fan of finding materials which naturally create the textures of real-life for his super detailed models :)

Here are some pieces which must have spent some time at depth.  Think the blue piece was the bottom of a bottle.

We even found a six sided die on the beach.  No idea how long this guy was in the water.  The little dots are pretty worn down.  But, after some scrubbing we could sort of see which side was 6 and which side was 4....

What was that role?  I think we got a 6!!

Caution:  some of the plastic you find is really brittle.  While this might not be great for modeling with, we figure this is some of the most important to pick up and put into the trash so that it doesn't break up into little micro plastic pieces which (as we understand) can really mess up fish and birds.

We've cut a piece of the Ocean Plastic *Shoe* out for mounting on a base.

We put the mini band-saw to work and cut some pieces to mount on square miniature bases.

Here's the miniature we mounted on our shoe plastic :)

We mounted our Starfinder Android mini on the piece of shoe plastic.  The granularity of the pattern on the Ocean Plastic seems perfect to us for the scale of the miniature.  Make it look like the android is standing on a very old concrete surface. 

Here is our Starfinder mystic miniature mounted on the reclaimed Ocean Plastic

And, we mouted our Starfinder mystic on the ball plastic.  Makes it look very much like a rocky alien surface.

All in all -- lots of fun.  Beach gets cleaner, we get weird plastic pieces for models :)

Saturday, November 25, 2017

Starship models for Starfinder RPG

Hi everyone,

We've really been enjoying our Starfinder Campaign - been playing pretty much every Sunday now for about eight weeks.

One struggle, though has been finding models for things -- especially Starships.  We're really hoping that there are some nice models released by Paizo or other companies.  But, since there aren't any released yet, have been working on finding solutions.

Recently there was a great post on the Starfinder RPG Facebook group -- a brilliant suggestion to take a look on Amazon for:

US Toy Mini Space Ship Cruisers Vehicle (Lot of 72), Assorted Color

...for under $10!!

 Here is our little bag of "Space Cruisers" from Amazon

Well, after a week or so, ours arrived :)

Here are the little *rubbery* models fresh out of the bag.  Some Amazon reviews mentioned a strong plastic smell.  We didn't notice that.

And, sure enough what a lot of nice little spaceship models!!!

What you get....
  • Some 70+ little models which are just the right size for use on the Starfinder hex flip map
  • They come in three colors - not great - but not horrid
  • There are about 20 or so different ship models - which is a pretty great variety!
  • They are "rubbery".  Not sure if they were meant as erasers - but they certainly do bend easily
 We sorted ours out by type.  Seems like 20 different types of space ships.

We were able to paint them....  First tried our super-shiny gold paint (thought it would be cool to have a gold colored spaceship).  No-go.  That rubbed off the surface of the little rubbery models.  Then tried our "Army Painter" primer (tried grey first).  No issues - these colors worked fine.  We painted some white, some grey and some brown.


Army Painter primer worked well (cans on the left).  Our other fun paint (which is very shiny gold) didn't work - smeared off.  You can see our white, grey and brown models along with the original blue, silver and bronze rubber.

This looked good going on -- by smeared right off.  Painting with Army Painter primer first did the trick tough.

After we added some details and weathering, they looked pretty nice.  By the way - when it comes to weathering, we found the bottle below "Weathering Mix" for $8 online (we searched Model Railroading Websites).  Much lower cost than little tiny bottles for the same price you can find from miniature painting companies....

 Our $8 bottle of "Weathering Mix"

Working on adding some details to our models....

Before and after adding details to the models....

Checking our models for scale on the Starfinder Flip-Mat.  Pretty good fit :)

And, so, pretty happy, overall.  Not sure whether we'll create bases for them - or just use them flat on the mat.  Since they are a little bit rubber, it's actually not bad to have them right on the mat where they don't slip around....