Saturday, September 26, 2020

Green TIEde Fighter - Spork's Fighta-Bomba - our Ork looted TIE fighter

The Green TIEd Fighta!
Another Fork and Spork - Pink Orks Looting Story:

One fine day aboard Fork and Spork's space hulk "Da Runcible Uv Ruin" Big Mek 'Eavy Tork shouted, "Oi!  Someting on da scannie!"

Da RUR (Da Runcible Uv Ruin) had been skipping through the Warp for some time now and much to the delight of Fork and Spork had brought the clan an exciting string of battles and an even more exciting chain of Lootins wif Dakka.

This particular day, the Orks pulled in a small craft which was spinning through space.  Inside they found an odd Space Marine -- whose black helmet and cape were a bit out of place.

"Mus' be we iz in some galaxy far, far awayz an' maybe a long, long time ago to find someting dis strange," grunted Spork when 'Eavy Tork showed him the salvage.

"But, let's loot it!" Spork continued, "An' dat humie looks burnt already - I donts want to eat any burnt hummus!"


Even with the Force powers, Darth Vader has no idea what is in store for his TIE Fighter!

In the "21st century Earth timeline" it started out as a Goodwill thriftstore find.  $3.19 for a Darth Vader TIE Fighter (Advanced) model.  Missing the cockpit hatch; missing the little Darth Vader figure.  And, right away, our Ork Lootin' gears started turning....


The raw material for our Green TIEd Fighta!  $3.19 price written in Sharpie pen.

First of all, it seemed fair that we should add some Orky metal onto the TIE fighter's damaged panels.  Would help it to go fasta and also be a place where we could have Orks with magnet boots stand on the model.


We found some pieces of sheet metal which were unused from an IKEA cabinet build.  Bent those around and with some epoxy, done -- onto the model to reshape the damaged panel.

The Vader TIE model had a nice little panel which slid open to view the engine compartment.  We decided to reshape the plastic and glue that open so that we could add some power feeds into that hardware later in the looting....


One of the fun things is always deciding how to modify looted 'ardware.

And we decided to add wings.  Why add the wings?  More places for guns!!!  Added some turreted guns with magnet attachments we had lying around.  Also -- made a nice place to hang some Ork bombs as well.


A look at some of our major modifications.

We also decided to add some bits to the bottom of the Fighta.  It was pretty boring without those....  We "borrowed" the engines from a Space Marine speeder to increase top speed.


A look underneath the plane.  Adding bits for more interest down here.

We had a big debate over whether or not to treat the cockpit with a Gorka/Morka face.  As a compromise the face is attached with a magnet.  So, when desired, it comes off.  This is also fun because we can change the angle of the face for different "Ork-titudes".


A view from the front of the Green TIEd Fighta - still a work in progress...

We found a pilot who would fit down into the cockpit (most of the way).  And, we added some plumbing from the engines to other areas on the plane.  This was going to be one of Spork's pink Ork's vehicles.  So, we used our method of super bright pink with Vallejo Paint in several areas.  To break up the coloring we decided to also create black and white stripes in the cockpit area.


Making progress.  Some pink in fun places and wiring and plumbing completed....

One of us is not such a great painter.  So, pretty happy that the white and black pattern turned out reasonably well....


Progress so far....


Added some special effects for twin-ion-engine plus smokey exhaust

And, wrapping up, one thing we have realized is that Ork model looting is never really finished.  There is always the chance to think of one more random bit to add -- one more hose or pipe to plumb -- or one more fun way to add color to the model.  

Feeling good about the progress so far.  But, whoah! we clearly need to do some work on our bases! 

Took a photo of the Green TIEd Fighta on an attack run with squadron mate :)


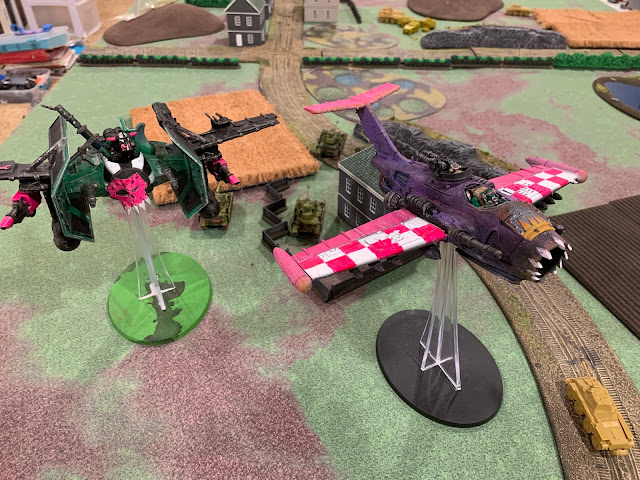
Green TIEd Fighta on attack run with squadron mate

Saturday, August 11, 2018

Laser turret from cleaning fluid bottle (fun and pretty easy terrain hack!)

Hi everyone,

We had a thought while carrying our the recycling trash to the curb a couple of weeks ago.  "Wonder if the top piece of plastic on that 409 bottle would be good for gaming terrain?"

And, going in, we should make an admission that of late, what with ocean plastic concerns, we have had a bit of an agenda to see if we can make good use of direct-plastic-recycling-for-gaming (maybe that's DPRFG for short?).  Here's a link to our blog post where we turned beach-trash plastic from vacation into miniature bases:  Cleaning up the beach - miniature bases

https://i5.walmartimages.com/asr/8d4a233e-ecf0-4aec-a151-29cc84ab9d87_1.fa7e2e24c8c0c1f8ec8121923de32a7d.jpeg?odnWidth=undefined&odnHeight=undefined&odnBg=ffffff

Here is the official and specific model of Formula 409 which we got thinking about in the recycling....

So, we set aside the bottom of the bottle.  Sadly, we haven't thought of a cool way to use that yet.  But, studying the top, we with a little bit of work, we did figure out how to get that outer "cowling" piece off.  And, wow - the mechanism underneath looked very cool!

We haven't figured out a use for the bottle yet.  So, this was recycled.

What we found inside struck us as looking very much like a laser turret.  Mind you, there was an odd white and red tube protruding downward.  But, for those of us with snippers, xacto knives or pretty much anything for cutting things, this didn't create a permanent set-back.  We snipped it off!

We also figured out how to pull away the square nozzle and the hand-trigger mechanism.  (That white plastic is pretty soft and easily pried away.)

Here are the pieces of the spray assembly -- with the outer white cowling removed.  In this photo we have already snipped the draw tube portion (the white and red tube) away from the main assembly.


And, after snipping off that tube, we got to thinking how much cooler our concept would look if that tube was fixed to the lower tubular structure on the whole nozzle-trigger assembly.

Here's where we wanted to fix that red and white draw tube.  Pointing forward - maybe like it's for a ranging system for the main laser cannon.


Next, we used some epoxy putty in two places.  1) Fixing that little white and red tube to the lower cylinder; and 2) Creating some weight at the rear of the unit sot that it would not flip over forward.  We probably could have used straight epoxy (which we like for a use like this where fracture toughness matters).  Or, super glue (which we are just not as good at).  But, epoxy putty was nice for location (1) because it allowed us to fuss with the angle of the little tube to make it exactly match the angle of the upper main firing tube.

Here's a link to our comparison of Epoxy vs. Super Glue - where we get into fracture toughness.


Looking down the barrel -- you can see where we stuffed epoxy putty into the lower portion - and then pressed our red and white tube inside there.

Here's a quick peak at the rear under portion where we added a little bit of epoxy putty to the inner walls.  This shifted the center of mass so that it wouldn't tip over.

We haven't done a lot of work yet on painting it.  Just did some black and grey priming.  Already, though you can see that it comes together pretty well as a laser turret!  Fun that there is even a downward pointing arrow cast into the 409 bottle's plastic right in the front.  And, the little beams and bars of the whole spraying assembly end up creating quite a sci-fi appearance.

Here is a look at our finished turret.  Going to have to think about how we want to paint it beyond this priming.

We haven't used the turret very much yet.  Just carried it around to check out next to other minis.  Going to have to start looking for more of these in the recycling!

On the playing table, turns out to look pretty cool!  It looks just about right next to this rebel soldier!

And, who knows, maybe there are other types of bottles with spraying mechanisms which are even cooler!


Monday, July 16, 2018

More Battletech Terrain - Kurita Weapons Depot

Hi everyone,

It's now February, 3039 in our campaign.  The team (which hasn't yet decided on a name for itself) has taken a job working for House Davion's equivalent of the CIA -- the Department of Military Intelligence, MI-4.

Here is a quick post with more of our work on terrain.  And, here is a quick link to our prior posting:  Terrain Update
 

The team has taken an assignment working for House Davion's Department of Military Intelligence MI-4:  Covert Operations Division (known as the "Stealthy Foxes")

The Mission:
  • Receive intel on the location in the McComb system of a House Kurita weapons and ammunition depot.
  • Assault the depot - overcome opposing forces.
  • With control of the depot, ensure neither the weapons nor ammo are available to House Kurita forces - i.e., take these off the market.
  • Payment:  since there can be no traceable connection to House Davion, the payment is modest -- but the team will receive 100% salvage rights including rights to captured munitions and equipment.
So, with this in mind, we knew we would need some terrain to make the attack more fun.  Here's what we came up with:
  • Could we build a walled structure?  If so, that would make an assault more fun - and make the scenario more interesting visually.
We got to work on what to use to build our walled structure.
  • Use recycled packaging plastic for wall pieces
  • Use medicine bottles for corner columns
  • Use magnetic joints to allow for flexible set-up [we might use these again in the future!]
Scrounging up four medicine bottles - we had three small ones and one medium sized one.  Figured that would be OK because we could mount more things on the larger one.

 Here are our four medicine bottles -- nothing fancy :)

Next we marked the positions where we could add magnets to the medicine bottles.  

Was a bit tricky to mark the bottles at 90 degree angles.  Managed to find a triangle square ruler which worked.  Note the darned-slippery plastic which would not stick to superglue!

Note:  the plastic of medicine bottles does *NOT* stick well to superglue.  Even when we roughed up the surface, the superglue was poorly bonded.  We had tried superglue first - but had to re-glue all of the magnets with epoxy [you'll certainly notice our epoxy blobs on the final pieces].

We then used the trusty band-saw to cut our recycled plastic into wall pieces.  We had learned on some prior efforts that if you cut the lip off the bottom of medicine bottles (to make the shape more clean) you also destroy the structural integrity of the bottle.  So, for the sake of time, we kept that structure and simply put a notch in the wall pieces.

Wall pieces are ready!

Then, with the magnets glued to the bottles, we needed some steel on the wall pieces.  We carved a slot out of the ends of the plastic and epoxy'ed nails in there.

Mounted nails to the ends of the wall pieces with epoxy

Then, we roughed up the plastic.  The cool thing is that it is made with a honey-comb internal structure.  Looks like it just might be some ferro-crete material!!  So, we sanded it down to make that internal part show a little bit.  We also sanded through in spots to create battle damage.  [After all, McComb is a border world - and has seen Kurita - Davion action at many points in the past.]

Sanded on the wall pieces to make them look worn and battle-damaged

Then, we added some camo-type painting -- aiming for a city pattern.  And, it seemed a bit plain after that, so we 3D printed a House Kurita banner with the one available on Thingiverse.

Here's our finished product:

Our finished walls with battle damage and Kurita banner.  Used some structures from Game Kastle Mountain View for the building inside.  We certainly need to have something ready for that which isn't blue (next time....)

General take-aways:
  • The magnets worked.  They are a little bit small - but do hold up the walls.
  • The medicine bottles look like medicine bottles.  *We have some work to do there!*
  • The camo-painting was fun.  We need a better set of patterns for doing this.
  • We need to do something to cover our epoxy blobs.
  • And, it would be fun to have a gate of some sort.
And, lastly, the battle damage was a good idea!

 Lance member Buckaroo (a.k.a. Bob Bobson) fires on the Kurita strong-hold with his Centurion!

Thursday, July 12, 2018

Battletech - Terrain Update

Hi everyone,

Recently we've started up a Battletech campaign (earlier posting about that).  And, we've been working on how to have fun terrain (earlier posting with terrain thoughts).

We've seen some nice responses to our earlier write-up that 3D printed terrain is a fun way to go.  That certainly does sound good.  In the meanwhile, we are posting a quick update after our first session using the HeroScapes terrain.

Some thoughts:

- It was really cool to create 3D structures.  We chose to put the "bad guys" for our campaign in a cave fortress with a turret gun for defense.

Here you can see our Heroscapes 3D set-up on our battlemat.  It was nice that we could slide the Heroscapes around and reposition during the session -- when we figured out that it would be better for the players to view things from the other 180 degree perspective.

- The turret gun was a nice balancing element.  As the GM we could choose it's armor level to help to ensure sufficient challenge for the team.

We used a tank as a "jury rigged" turret -- mounted on a pedestal of stone and structure.  The players could have attacked the structure if they had chosen - but instead attacked the turret until the large laser on the tank suffered a critical hit and was out of action.

- The transition from the HeroScapes to the smaller-scale battlemat was annoying.  The players put up with it - but it was not idea.  Going to think about how to do this better.  Do feel that if we had turned the battlemat by 90 degrees (so that it better aligned with the 60-degree orientation we had selected for the Heroscapes tiles, things would have been better.

- Oh - and how cool that with the 3D structures we created, our team's Crab pilot backed his way into a crevace -- just like a real life marine crab -- so that nobody could get behind him -- and so that his pincers were facing outward!!

The 'mechs up on top of the hill (Centurion and Wolverine) are attacking the turret -- their assignment was to take it down!  Down below the team's Dervish and Crab are tackling a Trebuchet and Cicada.  And, please note the fun position of the crab in the rock crevice!!

- We used the thin green Heroscapes tiles for trees.  This worked pretty well, and it was easy to place the trees quickly in a fun way.  Thinking we may need some to be either lighter green - or maybe more splotchy to signify level 1 versus level 2 trees. 

- Lastly, our painting has made the larger Heroscapes tiles difficult to get apart.  Planning to sand on those a little bit so that they are just a little bit more loosely fitting.

We'll post further updates.  In our next session we're going to use the fortress walls we built -- so that the team can assault a House Kurita weapons depot.

Friday, July 6, 2018

Battletech terrain - new thoughts

Hi everyone,

Following up on our work to support the Battletech campaign we've kicked off (link to that blog post) -- we have had some new thoughts on Battletech terrain and wanted to share those - and also how things are shaping up :)

1) We do like the *BIG* battle-mat with smaller hexes.

 Have enjoyed using the big battle mat which has smaller hexes.
  • The big battle-mat with the smaller hexes is nice because a) it's really fast to set up (i.e., you un-roll it!); b) you can write on it with over-head projector markers; c) it creates a sense of very long range.
  • The down side is that it isn't pretty to look at -- going to have to think about ways to add color and terrain to it.
  • When it creates a very long range sense, it allows for our *lance members* who like to fire from long range to have a drop zone which is outside of enemy firing range.  When we use the cardboard maps which come with the table top game (which do look cool) -- then we have to use quite a few of them to create that same effect.
  • We are thinking that what we may do is use the Heroscape tiles in the center of the battle mat -- and have a bit of a discontinuity in scale.  Outside the Heroscape tiles - you're on battle mat scale ("super long range") and you count and move with the smaller battle mat hexes.  Once inside the Heroscape tile space -- the tiles are larger and the more details throes of combat come into sharper focus.
2) Pink foam terrain was fun - but lots of work to make

Here is our first set of pink foam 3-D structures to use with the standard box set maps.
  • It was a lot of fun to have terrain which matched those cardboard map sheets.  And, we even made a HUGE one to use with the map which came with one of the expansions.
Here's a battle we run where we used our little pink-foam mountains and our really big pink-foam mountain.  It is fun when there are such steep angles to consider.  Brings up the question of whether or not to use the Pythagorean Theorem!!
  • But, these are a lot of work to create.  And, you can't really change them much once you have created them.  And, (especially in the case of the huge one) they are not convenient to store when the game is over!!
3) Excited about Heroscapes hex tiles!  ...Is it Hero Scapes?  Or Heroscapes?  Either way they are cool :)
  • We've been watching these on eBay for a long time - but they've always seemed a bit expensive.  Then, this past weekend we managed to get a set of them at the swap meet at our Mountain View Game Kastle store!
 The big huge trees are a little bit goofy - but the hexagon pieces are very cool!
  • We realized that they were a bit rough (a little bit too bright?) in terms of colors - so have been working on painting them.
The unpainted ones are the bright colored ones toward the bottom of the photo.  We started by priming them all brown - then added some sand and green colors.  More work to do....
  • Here's a quick look at them so far, with 'Mechs in operation.
Here are our painted Hero Scapes so far.  Think we'll do some dry brushing and add some other effects to the brownish look we have going so far....

4) Going to try mounting 3D printed structures and trees on to Hero Scapes tiles
  • Over the past couple of years we've 3D printed some structures from Thingiverse which were tagged as Battletech scale.  The only issue is that it's pretty easy to scoot them around on the board by accident.  Thinking that we could mount these to those really flat tiles (maybe the red ones) which were part of the tub of Heroscapes.
Here's a nuclear power plant we printed up.  This is one of the things we could mount onto a set of 3-4 of the flat Heroscape hexes.

This turbine was one of the first things we ever 3D printed.  It looks cool - but it slides around very easily.  Prime candidate for mounted on the hexes.

Thursday, July 5, 2018

Kicking off a Battletech Campaign

Hi everyone,

After enjoying a fun Starfinder campaign with several friends, we've decided to kick off a Battletech RPG Campaign.

But, after having played Battletech RPG for a while here and there (mostly trying the tabletop rules along with the Mechwarrior 2.0 RPG rules), we've decided to roll some innovations into our RPG sessions:

1) Make the RPG like the new computer game

We have been wondering if we can make our RPG sessions more like the computer game by Harebrained Schemes ??  Seems a worth goal!
  • Several of us in the campaign are *really* enjoying the new turn-based Battletech game created by Harebrained Schemes http://battletechgame.com/  And, there are several rules and order-of-play mechanisms in the HBS version which we would like to try to emulate in our table-top RPG sessions.
2) Use 3039 - border of House Kurita and House Davion
  • It sort of came about somewhat through discussion.  We didn't want the classic Clans vs. Inner Sphere battles -- but we did want the chance of some 3050 technology entering into our sessions.
  • Our thinking is that we can always have 3050 type things showing up here and there (as highly prized items or mechs) as prototypes which are under test.
3) Have fun with terrain
  • We've learned over time that this makes RPG sessions much more fun.  Easier to visualize the crazy things which could happen if there are fun terrain models.
  • In the past we've used made pink foam pieces to match our terrain maps.  Going forward going to try to do better than even that.
4) Use Obsidian Portal for game tracking and forums and such

Here's a quick example of our Obsidian Portal page - with one of our characters - Bob Bobson - call-sign "Buckaroo".
  • Heard about this from our friend Mr. J -- who uses it for his D&D sessions.  After a little bit of practice, it is extremely handy!  https://www.obsidianportal.com/
  • It's already been lots of fun to include character back-stories there - along with NPCs.  Going to take a little bit of practice, but feel this will help all of us to keep track better.
  • Had previously been using Google Docs or Google Slides for this in Starfinder.  This seems like an easier method :)
5) Create mechanisms to make the table top turn-based experience faster and more aligned with story telling.  Have some ideas on this already :)
  • We had seen how some people have used a d6 to mark walking, running or jumping of 'Mechs.  Not sure whether this is a new idea or an old idea - but we are thinking to mark the points of "evasion" with the d6's.
  • Also, one of our players proposed that we figure out a way to make all dice rolling simultaneous.  We think we may have this sorted out!!
We'll post more soon on how it is going!

Thursday, March 22, 2018

Pop-o-matic Dice Roller for RPG (and making it more random)

Hi everyone :)

After our fun time "rebuilding" a dice-rolling tray using an old game we found in a thrift store, we've been thinking about other fun things we can create to have fun in our Battle Gaming sessions.

Here's a write-up of one recent idea....

Some of us may have seen the game Trouble.  It's the one where the d6 (classic die) is under a plastic bubble in the middle of the game board.  And, rather than having a chance to lose that die (you can't -- it's under the plastic), you push down on the bubble - there is a pop - and you release and the die is rolled.

It's the apply named "Pop-o-Matic" die roller!

Here's an example of the "Trouble" game we found -- with the Pop-o-Matic in the center.

Well, we got to thinking that it might be pretty fun to rebuild one of those using some other dice.  Or, maybe just cut that one out of the game board with our little band-saw and use it as is.

Then, we got to reading on line.  (We figured, of course we aren't the only ones to have thought of this - and how has it gone for other people?)

RANDOMNESS CONCERNS:

And, that's when we discovered that there are randomness concerns with the Pop-o-matic.  Mr. Jason Knight spells it out nicely in his blog post.

The bottom line issue is that if the d6 is starting with a 6 showing - it is not fully random which way it will be the next time.  Sort of like, because the die is trapped in the plastic bubble it's a bit more likely to come back down with the 6 still facing up.  And, a little bit less likely to flip over and come back down withe the 1 showing.  (The other four sides have a probability which is somewhere in the middle between these.)

Here's a link to Mr. Jason Knight's blog post:
http://blog.jasonknight.us/2013/07/statistical-trouble-with-trouble-board.html

The front page of Mr. Knight's post.

MAKING IT MORE RANDOM - SMALL DICE:

Well, we certainly didn't want to go to the trouble of making something which wasn't very random.  So, what to do.  An idea struck - use smaller dice!!

At first we were thinking to use some of our really-really-small d6's which we've accumulated over time.

But, then at a great swap meet at our Mountain View Game Kastle, we found a super-sale on little vials of very small RPG dice.

They seemed just about perfect.  So, we bought a few.  :)

Here's a look at our vials of little RPG dice!

Then, with our plan in place, we went ahead an cut out the Pop-o-Matics from the Trouble game board.  (We actually had gotten two for just a dollar or two - so we had one to spare in case we messed up.)

Here is our Pop-o-Matic after cutting one out of the Trouble game-board.

We trimmed up the Pop-o-Matic very carefully with the band-saw.  Then, we loaded it with our replacement for the d6.  It was a little bit tricky to hold the metal spring piece in place with the plastic bubble and get it all lined up - but we did manage :)

Our Pop-o-Matic with glue drying....

And, here we are gluing it back together.  As we've posted before - we used epoxy to make sure our rebuilt Pop-o-Matic wouldn't break apart.

Here's a link to our blog-post about the higher fracture toughness of epoxy - compared to super-glue:
http://battlegaming1.blogspot.com/2018/01/superglue-accelerator-carefully-and-not.html

And, with that, we have our finished product.  As you'll see below, we couldn't really decide which of the little vial of dice to put inside -- so we put in all of them.

And, that's pretty cool!  You swirl the Pop-o-Matic around (to create a random initial state in honor of Mr. Jason Knight) and then Pop! the dice - and you have a full set of random results!!

Here's a photo of our finished Pop-o-Matic :)

And, here's a link to our super-short video of us testing it out....
https://www.youtube.com/watch?v=HexIUI-KMwU

A super-short video of us testing out our Pop-o-Matic!

What next?  Maybe build another one with some other colors of little dice?  (We chose the purple ones we had because of the very nice color contrast.)  Or, maybe make one with very little d6's -- but five or six of them -- so that you have one Pop-o-Matic for games which have multiple d6's to roll.

Tuesday, January 16, 2018

Superglue accelerator (carefully) - and not so much epoxy

Hi everyone,

A quick blog post with updates on our feelings regarding Super glue vs. Epoxy -- now that we have discovered the existence of Super Glue Accelerators!

A few weeks ago, while playing our Starfinder Campaign - and working on the crazy idea of merging in Battletech 'mech fighting rules we got to talking about the table about glues - and bemoaning the reality (as we understood it) that only epoxy dealt well with metal models the likes of which you often need to use with Battletech.  Then, Mr. T. (one of our friends and Starfinder player) chimed in that we should consider using a super glue accelerator.  Don't recall what he suggested - something like "Zip It".

We were absolutely intrigued.  Is this the secret so many utilize to make superglue workable for them?  Is this what we have been missing?

Our superglue accelerator and super glue side-by-side with the old trusty epoxy bottles

Because, quite honestly, most of our experiences with superglue had been poor.  Either we couldn't get it to set; or we glued our fingers together; or what we did glue fell and broke into many pieces.

So, we asked more.  "Be careful you don't burn yourself, though!" cautioned Mr. T.  He went on to explain that the heat of reaction between the superglue and the accelerator released quite a bit of heat and that you could really burn your fingers.  He indicated that he had done so many times over the years.

Well, we had to try this out!  Asking at Game Kastle in Mountain View we learned that they had two such products on the shelf.  We picked out "Insta-Set" and headed home to try the stuff with one of our Battletech models (metal, of course).

First Experience

To try out the Insta-Set we figured we had better be careful!
  1. We used it as a two person operation.  One of us put down the super glue; the other of us did the holding of the parts; then person one set down the super glue and sprayed on the accelerator.  (So, the two were never close to each other.)
  2. We wore gloves.  (We were worried about the "blistering hot" comments we had gotten when we bought the Insta-Set.)
  3. We were prepared for really hot.  Used our needle nose pliers for some of the early piece holding.

The bottle of Insta-Set uses a pump-spray action.  It was a little tricky to manage in all angles.  The liquid is quite volatile.  The stain you see on our paper back we used to catch over-spray was gone within 15 minutes.

And, maybe those were quite good precautions.  First of all - we did learn just how hot the reaction can make things (quite hot - very easy to understand the burning risk!!)  Secondly - at one point a little bit of glue got onto a glove - and the spray hit that - and WOW! quite a hot feeling to the fingers inside of the glove.  The good news is that the hot, curing glue was not stuck to the fingers - and we were able to quickly rip the glove off and get the heat away from our skin!!!

[PS:  We also read some online forum posts with discussion of whether or not the accelerator materials are flammable.  One person reported nearly burning off their eyebrows testing this out with a lighter!  No need to repeat that experiment, we'd guess!!]

But, when all was said and done - it really, really worked.  We whipped a metal model of a Clan 'mech together in something like 5 or 10 minutes.  And, that my friends would have taken us hours or days or curing time with epoxy.

Our new and old trusty glue options with Battletech 'mechs in the background

Here are the two 'mechs we built up in 15-20 minutes.  Much, much faster than we could have done with epoxy alone.

We built up another 'mech - a Stalker - which we had as bits - and then did a few tests to see how well the super glue bonds were holding together.  Not too bad!  The model was pretty sturdy!

Our Battletech models posing with the super glue and accelerator

So, we certainly learned that the accelerator is truly useful product - though with hazards and requiring very careful use.

What's our net judgement?
  1. This stuff is great for working with metal models.  And, we're guessing it's not bad at all with resin either.
  2. Be careful - wear gloves.
  3. Be careful - store separately.  [We don't like thinking about what would happen if a bottle of one mixed with a bottle of the other.]
  4. If you do have a long time for curing and want something more sturdy - use epoxy :)
So, you may wonder why after all of that we'd vote for epoxy when it is convenient.  Well, it all comes down to *fracture toughness*.

Our feeling is that even with the accelerator (which does cure the super glue) you still end up with a material which is more brittle - has lower fracture toughness - than the polymer you end up with joining your parts when you use epoxy glues.

Here's a nice article talking in a bit more detail about the differences.  In their words, "Super Glue sets quickly and has a very low shearing strength while epoxy sets slowly and has good shear strength."

A set of curves for fracture toughness of materials.  Metals are up in the upper right.  Things like glass are toward the bottom.  We figure epoxy sits higher on a set of curves like this than super glue.

And, if you don't mind indulging the paint job which one of us (who is not so great at painting) managed, please check out our Ghazkull Thrakka.

Read more: Here's our original blog posting where we struggled with resin, model glue and superglue

We gave up trying model glue (wrong for resin, we learned!!) and super glue (we couldn't manage it) and put him together with epoxy.  And, yes, if you look hard at his joints, you find some globs of the stuff, which, while Orky do detract from the model's appearance.

Here is our Ghazghkull Thraka model.  Assembled with epoxy!

So, maybe what we'll do in the future is use a hybrid ??  Put metal and resin model together carefully with super glue and accelerator.  And, then add some epoxy where we feel the joint might be whacked if the model falls on the floor.  (And, yes, if anyone is wondering, our Ghazghkull has survived many drops from table to floor.)