Showing posts with label General Battle Gaming. Show all posts

Friday, January 20, 2017

D20 Holder for Pharasma Numbers Spell

Hi everyone,

We've continued to enjoy playing Pathfinder - have a few different campaigns going these days.

And, for our Life Oracle (healer) of Pharasma, having little Pharasma symbol tokens to keep track of the "re-rolls" which come from channeling have really been great for other players to keep track.

Here's a link to our post on making 3D Pharasma Tokens

So, when we stumbled across the Level 1 spell "Lucky Number" we started thinking about how we might create something similar....

Here is a link to the Lucky Number spell detailed information

The plan....
- Create a plastic "holder" for a d20
- When the spell is cast, the affected player rolls their d20 and puts in into the holder
- Then, no worries about losing track of what that die roll was
- And, (as we've learned again and again in table-top games to be really valuable) there is a nice *reminder* of the extra provided by the real-life token of the item

Getting to work....
- After quite a bit of thought, it occurred to us that looking down on a d20, it has a hexagonal sillouette.  So, if we could 3d print a little hexagonal box, that would be perfect.

- Looking around on Thingiverse, we found one which was perfect!  A little hexagonal box - we just needed to figure out what size would be just right for a standard d20.


- There was some trial and error....

Tried @ 30mm -- way too big.  The d20 rattles around and doesn't even stay locked on a single number.

Tried 25mm -- still too big.  Better though.  Almost feels locked in place.

Tried 24mm -- too big -- still rattling (and that didn't seem like proper workmanship)

Tried 23mm -- now, too small.  Couldn't get the d20 into the box!

Tried 23.5mm -- just right :)

Here is our rather iterative approach to getting the size just right!

We are thinking that it might be fun to have some symbols on the sides of the d20 holders.  Working on options there....

Here are some printed out spirals to use as symbols on the d20 holders.  We haven't managed to print a high enough resolution spiral-comet yet - so trying these instead for now.

And, after some thought, decided to prime these grey so that they look like they are made of good "dungeon" stone :)

Our d20 holders lined up for priming....

We noticed that after priming things were a little bit more snug.  So, it is important to remember that paint does have a real thickness.  We probably could have gone 0.5mm larger after all!  (But, they did fit.)

Here are our d20 holders with dice inside :)

So, what's next....

- Working on those Pharasma symbols.

- And, the other idea is the light these up from below!  We left a spot unpainted on the bottom.  With a small LED, they do have a very cool blue glow!

And, how did they work?

- Well, in the first game, our character cast two "Lucky Number" spells.  So, two party members' characters had lucky numbers.  One was a 3.  Great!  And, it actually did come up during the session.  But, the other character had the number 20.  Rats - that doesn't leave much room for improvement!!

Wednesday, August 24, 2016

Custom Dice! (Wasn't as hard as we thought!)

 Hi everyone,  

Custom dice....  Playing at events or conventions, we've ended up with a few souvenir custom dice here and there.  Also, we've seen people playing with Space Marine dice when playing Warhammer 40K.  

Thinking about that -- and, while gearing up for playing 40K with our Ork Looted Train at Warhammer The Summit -- we were thinking how cool it would be to have more of the Green/Pink dice to go with Spork's Pink Orkies :)  [We figured the one Green/Pink die we'd found must have been a custom run somewhere.]  

We had found this single die -- perfect for Spork's Pink Ork Army.  We were trying to figure out where we could find more.  No luck so far....

We had gotten the Green/Pink D6 at Kublakon about a year back.  And, thought (maybe??) we got it from the Chessex stand there.  

So, we started out by doing some checking of the internet to see if we could find a way to order more.... Nope -- none of the websites seem to have the Green/Pink type.  

So, we started digging deeper - and when we found the e-mail for Chessex (figured we'd ask them directly) we stumbled upon the spot on their website which mentions custom dice.  

Custom Dice !! ?? !!  

Giving that some thought, it struck us....  "Wouldn't it be cool to be playing Pathfinder with one's Pharasma Oracle -- and have Pharasma symbols on the "6" side of the dice?" 

So, we took the image we had created in Windows Paint to 3-D print our Pharasma tokens.  (Here's a link to that adventure!)  And, e-mailed them to very friendly Chessex team....  (And, we also asked about Green/Pink dice, too.)
 
Here is the Pharasma symbol we had created in Microsoft Paint - coloring in the blue and yellow tinted one so that we had a monochromatic version....

Responses from Chessex:  

- No - they didn't make Green/Pink dice  
- But, Yes :) they'd be happy to make D6's with our graphic.  And, they even sent us a rendering of how the dice would look.  Said it would take 4-6 weeks - and at a price of about $1 per die we wanted created that way.
 
Pretty amazing that this is a rendering!  The Chessex team sent this to us very quickly after we sent our e-mail of the Pharasma image....

So, we placed our order.  And, right on time (just over 4 weeks), we got a very nice box in the mail from Chessex with the dice inside!!!  You can see for yourself - they look just like the rendering Chessex had sent us!  

The happy box from Chessex!  Pharasma dice inside!

And, of course we had to give them a try.  Did a lot of rolling.  They seem to be just as random as any other six sided dice.  (There was a brief moment of worry that the Pharasma-swirl might not come up as often as a normal "6 dots" on a d6.  Not to worry - they seem to work just fine.)

Here are our custom Pharasma dice along with our Pharasma tokens....

Thursday, July 7, 2016

Creating custom dice rolling tray!

Hi everyone,

Battlegaming One; Custom Dice Tray; RPG Dice Tray; Building a Dice Tray
We rebuilt the Farkel dice game tray into a custom-color RPG dice tray!

Over the past few months, playing some Pathfinder home campaign sessions, we've come to really want to have one of those cool dice rolling trays.  (How else can someone be sitting comfortably on the couch and still have a nice way to roll their dice!)

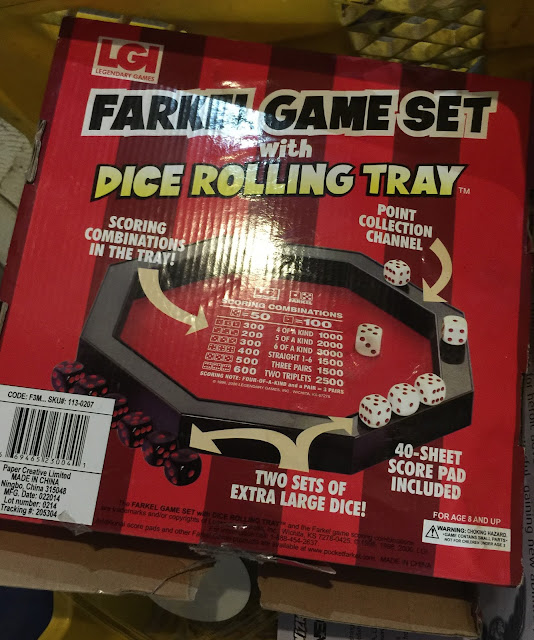
With that goal in mind, we stumbled across a game at a thrift store - and starting thinking about whether or not we could make a conversion....  From the "Farkel Game Set" (which doesn't really fit with the aesthetic of RPGs) to a cool looking dice tray....

We'll outline what we came up with below.  Bottom line is that it turned out pretty well :)

Step 1:  Found the Farkel Game Set -- $1.50.  Got us the plastic pieces we needed -- and even several dice for the collection.

Rebuilding games; Rebuilding Farkel; Using parts from thrift store
Here's a look at our $1.50 Farkel Game Set box.  Came with what you see here....  We didn't really like having all of that Farkel came business on our tray.  (Though it certainly would have worked!)


Step 2:  We pried the back plastic off of the rim plastic.  Turned out it was only glued at eight places (on the points of the octogon).  We found that 3-4 of these were pretty weak.  Once we had them loose, we pried the rest apart.

Here's how things looked once we pried everything apart.  We were able to get the rim plastic off of the back plastic.

Step 3:  We pried the red Farkel felt off of the back plastic piece.  It wasn't too hard to pull off.  Seemed like something kind of like wood glue or Elmer's glue which was holding it on there. 

The nice thing about the back piece is that it has black felt on the rear surface.  This helps it sit nicely on a table-top.  We left this alone :)

Here's how things looked with the felt removed -- and the two plastic pieces separated.

Step 4:  Size the new felt.  It turned out that there was an "inner lip" on the back plastic piece.  This was great because it meant that we only needed to size our new felt piece to go over that lip.  And, we didn't need to be very exact about it.  Then, the rim plastic bites on that lip -- but is glued to the outer edge of the back plastic.

[Where to get felt?  We got ours at Jo-Ann's Fabrics.  Suspect you can buy sections of felt - in pieces or by the yard in any fabrics store.]

We roughly cut the felt -- and then were ready to trace the imprint of that inner lip.

Here are the parts with our rough-cut felt piece.

Step 5:  Cutting to the outline.  We used our little clamps to hold the felt tightly to the back plastic.  Then, we traced that inner lip edge.  This gave us something to cut to.  So, we removed the clamps and cut with scissors.

Here's how things looked prior to cutting.  You can see the pattern we needed to cut to.  Nice and easy.

Step 6:  Test fit up.  We put all of the pieces together and had a look.  Things did fit!  We were a little bit worried because our felt was certainly thicker and more substantial than the red Farkel felt.  But, all was good.  We could press the rim piece down to where it previously bonded to the back piece.

And, we liked the colors.  The turquoise with the black rim.  We chatted a bit about what to do next.  Should we keep the colors the same (same black) -- or perhaps air brush the rim plastic another color.  In the end, we decided to stay with the high contrast black.  But, we wanted to end up with a mat finish -- and paint over the "made in...." marking.

Here is the test fit-up.  The turquoise with black looks good - and pieces fit together even with our thicker felt.

Step 7:  Paint and glue.  We used our black primer spray-paint to paint the rim piece -- and we didn't worry about the back piece.  Once this was done, we used super glue to glue the two pieces back together.

Here is our finished dice tray!

Here's how the tray ended up!  We had to re-glue a little bit of the back felt - but otherwise very solid.  We've been using it now for a month - and mission accomplished - works well on the couch!!  (By the way, as we're sure everyone who uses these knows -- it works well on a table as well!)

All finished - here's a test....  Not so surprising - it works :)


Monday, May 30, 2016

3D printing tokens for use in Pathfinder home campaign

Hi everyone,

We have been enjoying a Pathfinder home campaign for several months now.  And, it has been lots of fun to get together with a consistent set of friends for some RPG fun.

One of the characters we have been using is Dartmouth -- an Oracle of Pharasma.

Dartmouth has recently reached 5th level.  And, as we worked on the list of feats available for her advancement, we stumbled upon the "Fated Channel" feat.

Reading up on the Fated Channel feat, it seems that people have enjoyed using it -- but have found a challenge with remembering that they can elect to roll twice on a d20 roll in the next few turns.  [And, Wow! that reminded us of the trouble we had remembering things playing Warhammer 40K!!]

So, we had the idea of creating some little tokens we could use as a reminder piece for everyone -- that they could roll twice on something in the next so many rounds.

Ideas....

1) Pass out Pharasma colored d20's to everyone.  Certainly practical.  But, didn't seem to include very much flavor of Pharasma or Dartmouth the Oracle.  And, while it would be really cool if there were Pharasma d20's, didn't see any easy way to make custom dice for our small group.

2) Print out paper tokens.  Maybe even laminate them.  Was thinking that we could print out the Pharasma symbol.  And, then pass these out....  Worried about them just getting lost though.  A D&D or Pathfinder table quickly get cluttered with paper and dice.  Not a friendly place for a two dimensional object.

3) We thought about printing cards.  But, that seemed just as bad as using paper tokens.  Would be fine if we were playing with a group who used cards to keep track of spells and things.  But, heck, we're not.

4) 3d print a token!  Aside from the fact that we didn't know how to pull this off -- it did seem like a very cool option.  Doesn't get lost.  Has nice spirit of Pharasma and Dartmouth.  Plus, probably fun to make a paint.

So, we went at it.  Here were our steps....

1) We do have access to an XYZ Printing 3d printer.  It is a zero-bells-zero-whistles model, but has been pretty darned reliable for us so far.

2) We found a website called "embossify".  The website claimed to be able to take a 2d photo -- and turn into an embossed 3d STP file for printing.

3) So, we tested this out.  We took the Pharasma image -- downloaded it -- then uploaded it to embossify.com

4) Then, the trial printing.  Well, not so good.  We did not end up with something which looked ANYTHING like the Pharasma symbol.

 Our first attempt at 3D printing after the embossify process.  Not very recognizable!

Studying the problem, it seemed as though the nice coloring of the Pharasma "spiral" was causing the issue.  The embossify software seemed to be treating these as unique 3d surfaces. 

(Here is a link to Pharasma information -- including the colored in spiral:  http://pathfinder.wikia.com/wiki/Pharasma)

So, we went with the brute-force solution.  We colored in the "spiral" using Windows Paint.  Then, all we had was a black-and-white image. 

Here is our Pharasma symbol after coloring it all in!  (Pharasma symbol from Pathfinder.wikia.com)

After embossifying, here is the STP file pulled up in our 3D printer software.

5) Printing again with the file which came from embossify was money.  Printed out very nicely!

The good, the bad and the ugly.  The good one was generated after coloring in the Pharasma symbol.  The other two were trying to use the blue, white and yellow spiral.

6) We did some mass production -- printed out 9 of the little tokens.  (One for each of the players, plus a spare in case one gets lost.  And, one extra to light up.)

7) We did some priming and painting -- and bingo, little symbol tokens are ready to go!

Pharasma tokens; Pharasma symbols; Spiral symbol; 3D printing pathfinder
Here are our Pharasma symbols after mass production.  We made one for each member of the party (plus a spare)

For painting, we primed 8 of them black - and then came back and sprayed the top surface white.  The idea was to keep the black in the groove of the spiral.  Did some dry-brushing to make the top a little bit more white.

On one of them, we kept the plastic clear.  Our plan was to put this on top of one of our lighted bases (We had gotten these from Powered Play Gaming -- and here's our Blog write-up about that.)  Turned out pretty cool!

PS:  After playing several home campaign sessions, here is our feedback:

- The little symbols really help.  When someone is healed, they get a token.  If we're in the middle of a battle and they use it up -- they just turn it over (they are black on the back).  Then if they get healed again, they flip it back over again.

- Interesting side-point -- it's pretty fun to have the Cleric start having such a big impact on offense instead of mainly defense.  We have certainly not had as many misses since Dartmouth started fateful channeling :)

Pharasma holy symbol; Pathfinder tokens; 3D printing symbols; Pharasma Well, here is Dartmouth surrounded by her tokens.  You can see the one lit-up token as well.

Future thoughts....  Maybe build a magnetized attachment for Dartmouth which we can snap onto her base when she is spell casting....  Thinking of turning the spiral 90-degree so that it is spiraling outward from her toward her target(s)

Sunday, March 6, 2016

Dice: Old school (clear, sharp edged) D&D RPG dice

Hi everyone,

It struck us recently that the old school clear, sharp-edged, crystal-looking D&D or other RPG dice seem to be pretty much a thing of the past.

Here's our original set from the days of the first D&D edition.  (Always wished that one of these was red to make the full rainbow.)

 Our original 1980's sharp-edged crystalline dice.  (Never had red.)

And, so started looking on eBay.  Sure enough some people are selling "old D&D dice" -- or "vintage D&D dice."

And, so, for a reasonable sum, we got the following just this past week.

 The lot of old dice we found on eBay.  (Look, a red d12!!!)

There was always one issue with these dice.  Very hard to read them!!!

My friend had showed me the white crayon trick.  You srcub your dice with white crayon to fill up the imprinted numbers with white wax.  Suddenly, "pop" -- you can read them clearly.

[Had never really thought through the fact that this just might change the balance of the dice a little bit.  But, since the imprinting removes material - and likely makes them asymmetrical.  By loading up with wax we're just fixing that a bit!]

We never really had a great solution for d20s.  We'd scrub crayon into one set of 0-9 -- and those would be the high numbers.  And, the non-scrubbed ones would be the low numbers.  And, yes, the low numbers were still hard to read.

Here's our process:

 Scrubbed the faces of the die with white crayon.  Then rubbed off excess with paper towel.  Sometimes this required some repeats.

 Here are the d12 and d8 after we've done a few of the sides.

Problem with the crayon method.  The crayon usually wears off over time.  Bits fall out.  And, then you need to repeat the process in order to see the numbers clearly again.

And, remember this old fellow?  The edge-roughened d12 which - also very hard to read - had been marked up with a good old black pen!!

 Old school, edge roughened d12 with black pen highlighting!

Have to say, do miss these.  The new ones come in great colors and roll nicely.  But, the sharp crystal edges were very cool!

And, here is our set with the red die added!  Yay!  A full rainbow :)

Our dice with the red d12 added to the mix.

Saturday, August 15, 2015

LED Objective Markers in 40K -- One Way to Avoid Forgetting

Hi everyone,

LED Objective Marker, LED base, lit objective, LED miniatures, powered play gaming, battle gaming one
 Our favorite Space Marine and Ork with one of our LED Objective Markers!

We have written about forgetting things before.  One of the biggest things we tend to forget is using Grot or Mek abilities which can recover hull points -- or special rules like Ramshackle on our Ork Trukks.  We received lots of great suggestions and help on how to remember those things -- and the suggestions have helped :)  (Thanks!)  [Here's the link to our post from League week #3 -- the worst of forgetting things.]

Another problem we've faced though is forgetting to pay attention to objective markers!  Many times we find ourselves after Turn 2 or Turn 3 and realize that we've set ourselves up in a fabulous Ork Waaagh! type charge -- but have completely missed on a plan to end up holding objectives so that we can win the game.

In the last two battles, though, we have toted our LED lit objective markers over to Game Kastle in Fremont to play Mr. M's Space Marines.  And, you know what -- it has made a huge difference.


[Here's a link to our earlier post from the day our package arrived from Powered Play.  Has good photos of how things go together.]

In the first of the two battles there was only one objective, and we held the objective pretty well at the end (we ran out of time in the battle). -- and we'd humbly offer that we may have actually maneuvered a little bit better than Mr. M by paying really close attention to the objective marker which was sitting there glowing at us the whole time.  

[Warning - this was a Space Marines vs. Space Marines battle -- part of the campaign Mr. M has been running.  Lots of fun - but lots of blue models fighting blue models in this battle.]


The battle set-up.  Here you can see Mr. M setting up his tanks to fire on us as we approach the objective (which is glowing away in the bottom of the photo)!


Apologies for the blurry photo -- but it all happened quickly.  Our gunship came zooming out of reserves and dropped our Ironclad Dreadnought, Assault Terminator Squad and Inquisitor right on the objective!


And, there we were at the end.  Mr. M threw lots of troops at us -- but pretty darned hard to shake us off the objective when all of his assault troops were over on the other side of the board -- several turns away.

In in the second battle, we didn't do quite as well -- but we still managed to hold two out of four objectives at the end -- and if our Stompa hadn't died giving Mr. M lots of victory points, we would have been close in the running to have won.


The battlefield showing the four objective markers.  Marker #1 is flopped over (our Stompa stepped on it so that Mr. M couldn't get to it).

Looted Wagon, modified train, 40K train, ork steam train, ork choo choo, battle gaming one
Our Looted Wagon, "The Dakka Chugga" steams past Mr. M's drop pod headed for Objective #2.

We had objective #2 pretty well locked up with a mob of Boyz and 4 Killikans.  That lone Space Marine didn't hold out very long!!

On the other side of the battlefield, our Trukk didn't last very long against Mr. M's Land Raider.  So, we didn't end up holding objective #4.  But, we didn't forget about it :)

Our LED lit objective markers were a thank-you item from  Powered Play Gaming the LED-base Kickstarter project they just completed.  We haven't built-up any LED-base operated miniatures yet -- though we do have a few Orky ideas.  Pretty happy with the objective markers regardless :)

Thursday, June 18, 2015

Powered Play Bases and Objective Markers Arrived Today!!

Hi everyone,

Very exciting -- our PoweredPlay Bases and Objective Markers Arrived Today!

[Here's a link to the PoweredPlay webiste]

Battle Gaming One; Light Up Miniature Bases; Lit Bases; Lit Miniatures; LED Miniatures
Here's what arrived today!  Light-up bases and Light-up objective markers!

We had first met the Chris from the PoweredPlay team at the Bay Area Open convention last year.  Had a great time chatting with him -- and learning about his plans.

Then we bought one of the basic kits -- and still working on fitting it into our Ork Steam Train / looted wagon, the Dakka Chugga.  (Going to be sweet having the burna of the locomotive lit up!)

Then, our friend Corey at Gator Games showed off a Warmachine model he had cored-out to add an early prototype of the PoweredPlay team's 'light-up-base'.  Extremely cool!

And, now our set has arrived....

Have to say that we're pretty excited about the light-up objective markers.  Reason:  we tend to be subject to forgetting things -- and among those things we might forget -- where the objective markers are.  If they're lighting up, it's gotta help!  [Here's one of our blog posts / rants about our poor remembering skills while playing 40K!]

Here's how the objective markers look once we got them assembled.

 First we loaded the button cell battery into the LED assembly


 That fit into the bottom holder


 We placed the two slotted pieces above to create the "light pipe" to connect to the marker


Battle Gaming One; Light Up Miniature Bases; Lit Bases; Lit Miniatures; LED Miniatures
 And, Shazam! here's our marker lighting things up :)


We'll glue the assembly together and work on painting things into a nice color scheme.  (Fork will likely pitch for yellow; Spork for Pink....)

We have some ideas for the bases already -- will post more about those soon.  (Some ideas as part of our Pythos IV campaign -- Supreme Ork Warbosses Fork and Spork working on some more looting -- and going to light those up!


Tuesday, June 2, 2015

"Use Real Things for Real Things!" - Update on how to make pipes, tubes, wires, cables, etc....

Hi everyone,

Wanted to post an update on what we've found to be a better way to do things....

Few weeks back we were posting about using our little press (from Poland) to make wires, tubes and such out of epoxy putty.  (Here's a link to that blog post.)

And, we mentioned that when we chatted with Seth at Game Kastle about this -- mentioned that we wanted to add wires and hoses to our Ork Supreme Warboss (Spork) -- and also that we wanted to add bigger, more involved ones from the "engine" to the "Eldar unit" on our newest locomotive conversion "Da Pain Train"....

And, after being super patient and indulgent, Seth said "use real things to model real things."  :)

So, we've been working at that!  Here's our update.  Spoiler alert:  Of course, Seth was right.  PS:  Got very similar and excellent advice from friends on DakkaDakka.

1) Wires / cables.

Where to get little cables?  Well, around here, if you need old electronic stuff, you can buy recycled electronics at nice low prices:  Weird Stuff Warehouse!

So, we headed down there -- and got some small spools.  You can see the prices on them ($0.50 and $1.00 and $3.00).  The super small gauge wires were cheaper (30 AWG) the 18-20 AWG bigger stuff was a little bit more....

Here are some spools of wire - and a short length of multi-conductor wire we got at Weird Stuff!

Then, we brought out our trusty hand drill (some good advice from a different DakkaDakka set of questions and help from friends)....

Here is the little hand-drill set we got on Amazon

After a little bit of experimentation -- found that one of the small drill bits is JUST right for the 30 AWG wire.  Don't even need to strip the wire.  Slides in with insulation on!

For the larger wire, we used one of the middle-sized bits -- and there we did have to strip the wire to get it to fit into our drilled hole.

What we were going for on Spork was to run "power" from his backpack (which we had built up from some bits) to a) his leg; b) his head; and c) his POWER SPORKA....  So, we used little wires for his head and his leg.  And, then we used the bigger wire for the POWER SPORKA.

After cutting the wires -- we primed them.  (Ended up with lots of paint on our fingers.)  Then a little bit of painting and super glued them into place.

Here is how Spork is shaping up these days.  Going to add some spikey bitz to that front pink part of the POWER SPORKA.  Had put the chains and skull there.  But, when we decided to change his pose to "OVER DA HEAD" had to move those.

We were also really eager to find a way to do pipes and tubes (so that we could run LIKWIDZ and GASSEEZ between the engine and the looted Eldar flying on Da Pain Train)....

So, we found that on HobbyLink we could order miniature PVC tubing, rods -- even I-beams!

Weren't very expensive -- and just arrived....  They are going to work out well.  But, as you can see we've got a little bit of work to do to get 'little tubes' which fit nicely inside 'bigger tubes' -- to resemble tubes, fittings, unions and the like as you'd find in real plumbing systems.

The tubes, rodes and I-beams we got on HobbyLink

So, now (in addition to finishing up Spork) we're ready to start work on Da Pain Train :)


Da Pain Train - Gotz rodz and pipez.  'Ere We Go!

And, with the plastic I-beams we got -- what'll we work on?  Well -- mostly likely a gantry for the Grot Rokkit so that we can use it with the Ork Pulsa Rokkit rules in the up-coming campaign!


As for the little press -- it's still going to see action.  As we see it now -- it's still great for making tubes of different sizes -- particularly when we need them to bend very tight corners.  So, planning to use it on Da Pain Train to make 90-degree elbow piping pieces  :)

Saturday, May 16, 2015

Hose and Wire Maker from Poland (Better 40K Models!)


Hi everyone,

We got our "Hose and Wire Maker" from Forge Planet in Poland two days ago -- and we thought we'd write about how it has worked out :)

Searching for ways to make hoses and wires to add to our Fork and Spork models (link to that work) and to our second Ork Train (link to that as well), we had watched this Youtube video where a person in Poland demonstrates using a little hand-press to make hoses and tubes and wires.

Here's a link to the Youtube video

And, here's a link to the Polish company's website

It looks very each and fun in his video -- but we weren't sure if we should order one 'all the way from Poland.'  But, after chatting with Mr's Z and L about "how do you make hoses and pipes" it seemed that this was a credible solution.

Hose and Pipe Maker; Forge Planet; Warhammer 40K; Battle Gaming One


 Our shipment from Poland :)

Well, sure enough, the package arrived.  At first, when the Post Office said where the package was from, was wondering what we had ordered "from Portland" -- but turned out to be our shipment "from Poland"....  Not everyday you get a box from Poland -- cool the see the stamps!

Note to everyone, that there is going to be some assembly required.  The pieces of the little hand press arrive sort of like a Games Workshop model.  Still on the sprue and also with some flashing -- so we'll need to cut that part off.

Hose and Pipes; Forge Planet; Battle Gaming One
Here are our pressing parts.  As you can see we have a little bit of work to do to have everything looking spiffy -- that's OK -- impressed that it works!

But, that's OK with us.  The cool thing is that the little hand-press works!  We took a stab at things we had seen in the video before we had cut all of the flashing off.  Dang-it the little thing is slick.  You end up with tubes and hoses just like he does in the Youtube video -- and we're pretty much rookies at trying this thing.

In the picture below is the base of the hand-press.  The idea is to put a bottom half of the press into the slot in the base.  To try things out, we just used the base as the flat surface to test with.  And, worked pretty well....

Battle Gaming One; How to make hoses from Green Stuff; Hoses and Pipes
Tried the press tools out using the base -- adding water the way the person did in the video helped out!  Recommend that!

Here are some of our trials.  Different hoses....  Tried to make an Ork "horn" -- not too bad....

Forge Planet; Hose and Pipes from Green Stuff; Battle Gaming One
Here are our very first trials.  Not too bad, right?  It was really easy to shape them after we had rolled them into these patterns.

So, now that we have this working, here's the order list for the hand-press hose and wire shop....

1) Need to make some hoses and wires to connect Spork's backpack to his Power-Spork.  Should be pretty easy -- doesn't need to be much longer than the ones in our trials.

2) Going to make some bundles and set of cables and hoses to go from the "engine" of Da Pain Train up to the "turret" -- to transfer power so to speak....  This will be a little more tricky because we're going to need to figure out some way to splice sections together to make some which are ~ 3 inches long.

Will let everyone know how those go :) 

UPDATE June 2nd, 2015:

In addition to practicing with the little press, we've also found a place where we can get little miniatures tubes (in long sections) and also gotten some coaching on using actual wire to model large cables.  Here is our blog posting about that.  Plan is to put all of these skills together and get to work on Da Pain Train!