Sunday, July 10, 2016

Kannon Kar - (Pink Orks' Mek contributes to the Waaaghbash Kannonball)

Hi everyone,

Supreme Warboss Spork has been ENKOR-RAGIN' his Pink Ork army's Meks to come up with some BIGGER DAKKA for the battle he can feel coming.  He has agreed to an alliance with his brother Fork and his yellow Orks - and together they are readying the Waaaghbash Kannonball, their Ork Looted Train!

Waaaghbash Kannonball; Ork Looted Train; Dakka Chugga; Spork; Fork
 The Ork's Waaaghbash Kannonball!

What's been on Spork's mind is that a really, really big gun mounted as part of the train has very clearly been used in the history of FIGHT'IN!!  Spork's Weird-boy has pulled the following images from the Warp for study:

Believe this train mounted gun was built by the French army.  Though pretty sure there are examples of this built by many armies over time....

An even earlier example of a train mounted cannon!

Catching you up, here are several posts related to the Waaaghbash Kannonball:
- The grand plan for the full looted train, Waaaghbash Kannonball
- The Dakka Chugga, looted steam train (POWER'D BY BURNIN' NIDZ!)
- Da Pain Train, looted from Eldar hardware
[This, here is the post about the Kannon Kar]
[And, still have work to do on the Kaboose Observ-obliteration Kar]

Spork's team has the following ideas for the Kannon Kar:
  • Should have a really big gun.  After looking around, found a very nice big Tyranid "arm" gun.  Figured this could be looted with some way to mount it.
  • Fully functioning turret; fully functioning elevation.  We weren't sure how to do this.  But, Spork has learned the hard way that if guns can't aim (with the help of Grots), they are pretty limited in what they can shoot.
  • Had the idea of using a "Plasma Ball" on the Kannon Kar.  Got this idea from a very nice posting on Dakka Dakka where a visionary Warboss and Mek had mounted one onto a Morkanaut (here's a link to Deathwhisper's post)
And, for the beginning, that was it.  Then, had a nice visit with the team at Reno's The Summit Warhammer store.  (Happened to be on the Space Marine's Birthday.)  Chatted with them about the idea of playing a Death Race type scenario (which, of course, being a fight or battle, Fork and Spork agreed to)....  And, they pointed out that it would be pretty cool if the Kannon Kar's assemblage could disconnect from the flat car and charge into the battlefield if/when necessary.  Have had this idea echoed by several others in the past few weeks, so figured we needed to find a way to do it.
  • Mount gun on mobile platform.  Well, a Rhino turned out to be pretty easy for Spork's boyz to obtain....  [And, disclaimer -- one of us -- who also works hard on his Space Marine Army pointed out that Ork looting was a pretty darned poor use of the Emperor's valuable Rhino!!!]
  • Create a locking turret.  More tricky.  Lacking detailed plastic - and not wanting to use HUGE magnets, decided on using a threaded turret assembly.  Probably crazy to watch in real life - if the tank body is rotated enough times (righty-tighty; lefty-loosey), it comes free and can drive off the flat car.
As a bonus, the use of a Rhino provides a location to mount the 12V battery needed for the plasma ball's battery :)

Our Basic Raw Materials....

Here are the flat car (which once upon a time launched Lionel Train rockets with a little spring - ours doesn't - we got this off eBay for lower $$); the Rhino; and the Tyranid "arm" for the Nid Gun....

Kannon Kar; Tyranid Gun; Nid Gun; Ork Looted Tyranids
Caption....

Turret Assembly:

Looking around, we stumbled on the safety lid for medicine bottles.  We could cut the top off the bottle and then use the lid (which had threads on it) to mount on the flat car - and thread the tank onto that.

Here's the medicine bottle we looted to form our turret.  Cut off the top of the green plastic from the pill bottle - glued this to the bottom of the Rhino.  Then, mounting the lid onto the flat car.

So, here is the flat car with the lid glued on.  We had to build some I-beam structure under the lid to make sure that the Nid Gun wouldn't hit the brake superstructure on the flat car.  Added some bits for the rotation's automation.

Here's our flat car so far.  Have the rotation hardware in the works.  Needs some Seth Wires and Pipes to be added yet.

The Kannon -- Nid Gun

We cut off the "shoulder" connection part of the big tyranid arm -- and then had the idea to glue that onto an Ork Gun.  We connected the two with some "Seth Wires" (link to our lesson from Seth at Game Kastle - use real things for real things....)


Here is the tyranid gun-arm glued onto the Ork gun....

Very fine Seth Wires on this side - connecting the Ork power supply to the little "holes" in the tyranid arm up above....

One bit Seth Wire on this side to connect the Ork power to the Tyranid section....  (We added some other Ork bitz for fun!)


What was cool about that is that the Ork gun was set up to mount in a Lobba set of brackets for elevation.  Of course, we didn't have an extra Lobba bracket-set.  So, we dug through our bits.  And, what do you know - the forks of a Warbike (if turned inside-out) fit right onto the little plastic buttons on the Ork gun.  So, we used some hunks of sprue to build up an assembly to allow for the elevation.

Here is our gun hinge formed out of Warbiker forks with a couple of pieces of sprue glued on.  Probably going to add an Ork or Grot to be the elevation operator - but haven't done that yet.

Even more cool, that set of Warbiker forks fits right into the front of the Rhino!

Nid Gun; Battlegaming One; Kannon Kar; Looted Tank; Looted Tyranids
Here is the 'Nid Gun on the front of the Looted Rhino.  You can see the inverted forks fitting perfectly into the front of the Rhino!

The Plasma Balla and Power Supply

We had sent a message on DakkaDakka to Deathwhisper to inquire about the plasma ball they had used on their Morkanaut.  Feedback was to look at Amazon, searching on Thunderball Plasma Pendant.  It's only about 2" across - so perfect to use.  (Here's a link - though probably need to find a different way to buy right now - this one says it's not in stock.) 

The Thunderball comes with a 12V car's cigarette plug - and a string of 12V hearing-air type button cells wired up.  Deathwhisper had warned us that the wiring (including the fuse in the plug) were a bit finicky - so we were ready for trouble.

Main thing was that we wanted ours to be rechargeable - and didn't intend to use in a car.  So, we cut away the alkaline batteries and the car plug.

Then, searching on eBay we found a very small 12V lithium ion battery which came with a charger.  (It took some searching to find one small enough to fit inside the middle of a looted Rhino!)

We wired this up to the 12V input to the Plasma Ball's boost converter - and Wow! we were in business.

Looted KFF; Kustom Force Field; Kannon Kar
Here is our rewiring job in completed state.  Lithium ion battery pack spliced to input of boost converter for Plasma Ball.

Quick video so that you can watch the plasma ball working - this was plugged into the car....

Another video of the plasma ball working from our 12V batteries

So, that's where things stand.  Lots of work yet to do -- here's a list.  And, of course, open to new ideas....
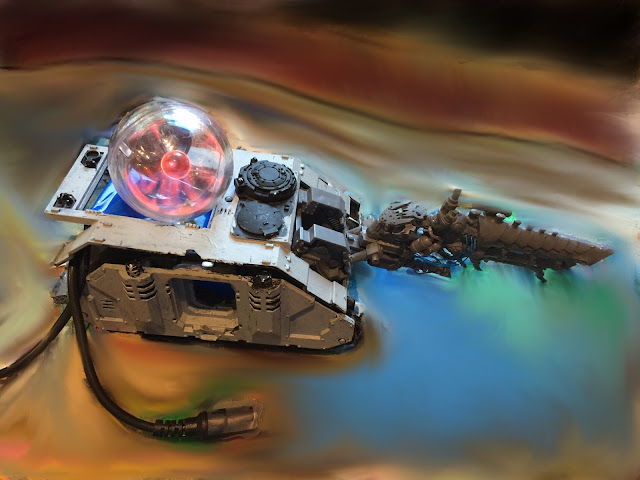
  • Air brush the tyranid gun arm the same colors we used for the tyranid bodies in the Dakka Chugga's tender (blue and turquoise)
  • Add more Orky bitz to the Rhino
  • Build a "holder" for the plasma ball -- probably will use more tyranid bits for this
  • Add Seth Wires to connect the plasma ball to more parts of the tank
  • Mount things together with magnets (figure we need to use magnets in case we ever need to update the wiring)
  • Mount the recharging cable in a way which looks cool - not dangling behind the Kannon Kar!
  • We'll probably have room on the flat car for some Ork boyz -- we'll see...
Kannon Kar; Ork Kannon; Ork Looted Tank; Plasma Ball; Ork KFF
Here is the Kannon Kar so far - with Plasma Ball flaring away!

Thursday, July 7, 2016

Creating custom dice rolling tray!

Hi everyone,

Battlegaming One; Custom Dice Tray; RPG Dice Tray; Building a Dice Tray
We rebuilt the Farkel dice game tray into a custom-color RPG dice tray!

Over the past few months, playing some Pathfinder home campaign sessions, we've come to really want to have one of those cool dice rolling trays.  (How else can someone be sitting comfortably on the couch and still have a nice way to roll their dice!)

With that goal in mind, we stumbled across a game at a thrift store - and starting thinking about whether or not we could make a conversion....  From the "Farkel Game Set" (which doesn't really fit with the aesthetic of RPGs) to a cool looking dice tray....

We'll outline what we came up with below.  Bottom line is that it turned out pretty well :)

Step 1:  Found the Farkel Game Set -- $1.50.  Got us the plastic pieces we needed -- and even several dice for the collection.

Rebuilding games; Rebuilding Farkel; Using parts from thrift store
Here's a look at our $1.50 Farkel Game Set box.  Came with what you see here....  We didn't really like having all of that Farkel came business on our tray.  (Though it certainly would have worked!)


Step 2:  We pried the back plastic off of the rim plastic.  Turned out it was only glued at eight places (on the points of the octogon).  We found that 3-4 of these were pretty weak.  Once we had them loose, we pried the rest apart.

Here's how things looked once we pried everything apart.  We were able to get the rim plastic off of the back plastic.

Step 3:  We pried the red Farkel felt off of the back plastic piece.  It wasn't too hard to pull off.  Seemed like something kind of like wood glue or Elmer's glue which was holding it on there. 

The nice thing about the back piece is that it has black felt on the rear surface.  This helps it sit nicely on a table-top.  We left this alone :)

Here's how things looked with the felt removed -- and the two plastic pieces separated.

Step 4:  Size the new felt.  It turned out that there was an "inner lip" on the back plastic piece.  This was great because it meant that we only needed to size our new felt piece to go over that lip.  And, we didn't need to be very exact about it.  Then, the rim plastic bites on that lip -- but is glued to the outer edge of the back plastic.

[Where to get felt?  We got ours at Jo-Ann's Fabrics.  Suspect you can buy sections of felt - in pieces or by the yard in any fabrics store.]

We roughly cut the felt -- and then were ready to trace the imprint of that inner lip.

Here are the parts with our rough-cut felt piece.

Step 5:  Cutting to the outline.  We used our little clamps to hold the felt tightly to the back plastic.  Then, we traced that inner lip edge.  This gave us something to cut to.  So, we removed the clamps and cut with scissors.

Here's how things looked prior to cutting.  You can see the pattern we needed to cut to.  Nice and easy.

Step 6:  Test fit up.  We put all of the pieces together and had a look.  Things did fit!  We were a little bit worried because our felt was certainly thicker and more substantial than the red Farkel felt.  But, all was good.  We could press the rim piece down to where it previously bonded to the back piece.

And, we liked the colors.  The turquoise with the black rim.  We chatted a bit about what to do next.  Should we keep the colors the same (same black) -- or perhaps air brush the rim plastic another color.  In the end, we decided to stay with the high contrast black.  But, we wanted to end up with a mat finish -- and paint over the "made in...." marking.

Here is the test fit-up.  The turquoise with black looks good - and pieces fit together even with our thicker felt.

Step 7:  Paint and glue.  We used our black primer spray-paint to paint the rim piece -- and we didn't worry about the back piece.  Once this was done, we used super glue to glue the two pieces back together.

Here is our finished dice tray!

Here's how the tray ended up!  We had to re-glue a little bit of the back felt - but otherwise very solid.  We've been using it now for a month - and mission accomplished - works well on the couch!!  (By the way, as we're sure everyone who uses these knows -- it works well on a table as well!)

All finished - here's a test....  Not so surprising - it works :)


Tuesday, June 28, 2016

The Waaagh-Bash Kannonball - 40K Ork Train Update

Hi everyone,

Supreme Warbosses Fork and Spork are making progress on the Waaagh-Bash Kannonball (their looted Ork Train)!  They are now up to two ENGINS' and two KARZ with quite a few big shootas of several types.

Fork and Spork are hard at work because they have agreed to take on other armies in some kind of death race!  So, they have their Big Mek and his crew hard at work.

Ork Train; Fork and Spork; Waaaghbash Kannonball; Looted Train
Supreme Warbosses Fork (left) and Spork (right) are ready to use Ork-style motivation!  Meks need to hurry up and finish the Waaaghbash Kannonball!

Ork train; Ork steam train; Warhammer train; 40K Train; Waaghbash Kannonball
Here is the Waaaghbash Kannonball so far.  The Dakka Chugga is in the front, followed by Da Pain Train.  Karz behind that for more dakka!

Dakka Chugga [Link to earlier post]

The Dakka Chugga is the first Lionel Steam Engine which our Orks looted.  Lots of Tyranid power at work here.  The TENDA is willed with Tyranid bodies -- being chucked into the ENGIN.

We've had lots of fun with the Dakka Chugga.  Took it up to Canada and played against Matt (in a Beat Matt Batrep) and his Tyranids.  And, since then have had a few other Tyranid battles against our friends back at home.  The best moment was rolling some Tyranids off the board (nothing better with a looted steam engine)!!

Da Pain Train [Link to earlier post]

Da Pain Train is nearly finished.  We have the main firepower set-up.  Though we do need to connect the main Eldar gun to the top turret.  Also need to put the engines inside and hook up the wirin' and plumbin' from the engine to the rest of Da Pain Train.

Da Pain Train is being built by Fork's meks.  So, the paint scheme will be yellow, black and red.  Will probably paint over the original Lionel train model's yellow painting of the base and front railing -- and make this black and/or metallic looking.

We'll post more with details of the engine and wiring as we go in the next few weeks.

40K Train; 40K Diesel Locomotive; Warhammer Locomotive; Da Pain Train
Here is Da Pain Train so far.  Lots of looted Eldar parts.  Figure it should have the firepower of a full-blown Battlewagon!

The Kannon Kar

What we're thinking here is to mount a looted Space Marine tank onto the low-boy flat car you see in the photo.  We'll mount it so that it is turreted -- and the while tank will be able to turn.  Then, we're going to connect the Tyranid shoota to the tank and wire it up to a Tellyporta type power supply -- which will be in the form of a small plasma ball (such as the great Ork master managed for his Morkanaut).  We'll fit the 12V battery needed to fire up the plasma ball down inside the tank.

The thinking will be that if the Waaaghbash Kannonball hits an Obstrukshun -- and can't plow through, the Kannon Kar's tank can drive off the flat car -- and go "deal with" the issue up close!

Looted Space Marine Tank; 40K Train with Kannon; Ork Plasma
Here is our Kannon Kar so far.  We got a beat-up Space Marines tank off of eBay -- and have now pried it open.  We'll be fitting our 12V battery for the plasma ball inside the tank.  Then, we'll mount this looted Tyranid Kannon to the front.

Kaboose

Lastly the Kaboose of the train will be looted from this Lionel "observation car" type passenger car.  As you might have guessed, Fork and Spork are thinking to load this up with as many boyz and dakka dakka as it will hold!!


Ork Boyz in Train; Kaboose; 40K Kaboose; 40K Caboose; Warhammer Caboose
Only question for the Kaboose is....  How many Boyz can we fit in here!

Monday, May 30, 2016

3D printing tokens for use in Pathfinder home campaign

Hi everyone,

We have been enjoying a Pathfinder home campaign for several months now.  And, it has been lots of fun to get together with a consistent set of friends for some RPG fun.

One of the characters we have been using is Dartmouth -- an Oracle of Pharasma.

Dartmouth has recently reached 5th level.  And, as we worked on the list of feats available for her advancement, we stumbled upon the "Fated Channel" feat.

Reading up on the Fated Channel feat, it seems that people have enjoyed using it -- but have found a challenge with remembering that they can elect to roll twice on a d20 roll in the next few turns.  [And, Wow! that reminded us of the trouble we had remembering things playing Warhammer 40K!!]

So, we had the idea of creating some little tokens we could use as a reminder piece for everyone -- that they could roll twice on something in the next so many rounds.

Ideas....

1) Pass out Pharasma colored d20's to everyone.  Certainly practical.  But, didn't seem to include very much flavor of Pharasma or Dartmouth the Oracle.  And, while it would be really cool if there were Pharasma d20's, didn't see any easy way to make custom dice for our small group.

2) Print out paper tokens.  Maybe even laminate them.  Was thinking that we could print out the Pharasma symbol.  And, then pass these out....  Worried about them just getting lost though.  A D&D or Pathfinder table quickly get cluttered with paper and dice.  Not a friendly place for a two dimensional object.

3) We thought about printing cards.  But, that seemed just as bad as using paper tokens.  Would be fine if we were playing with a group who used cards to keep track of spells and things.  But, heck, we're not.

4) 3d print a token!  Aside from the fact that we didn't know how to pull this off -- it did seem like a very cool option.  Doesn't get lost.  Has nice spirit of Pharasma and Dartmouth.  Plus, probably fun to make a paint.

So, we went at it.  Here were our steps....

1) We do have access to an XYZ Printing 3d printer.  It is a zero-bells-zero-whistles model, but has been pretty darned reliable for us so far.

2) We found a website called "embossify".  The website claimed to be able to take a 2d photo -- and turn into an embossed 3d STP file for printing.

3) So, we tested this out.  We took the Pharasma image -- downloaded it -- then uploaded it to embossify.com

4) Then, the trial printing.  Well, not so good.  We did not end up with something which looked ANYTHING like the Pharasma symbol.

 Our first attempt at 3D printing after the embossify process.  Not very recognizable!

Studying the problem, it seemed as though the nice coloring of the Pharasma "spiral" was causing the issue.  The embossify software seemed to be treating these as unique 3d surfaces. 

(Here is a link to Pharasma information -- including the colored in spiral:  http://pathfinder.wikia.com/wiki/Pharasma)

So, we went with the brute-force solution.  We colored in the "spiral" using Windows Paint.  Then, all we had was a black-and-white image. 

Here is our Pharasma symbol after coloring it all in!  (Pharasma symbol from Pathfinder.wikia.com)

After embossifying, here is the STP file pulled up in our 3D printer software.

5) Printing again with the file which came from embossify was money.  Printed out very nicely!

The good, the bad and the ugly.  The good one was generated after coloring in the Pharasma symbol.  The other two were trying to use the blue, white and yellow spiral.

6) We did some mass production -- printed out 9 of the little tokens.  (One for each of the players, plus a spare in case one gets lost.  And, one extra to light up.)

7) We did some priming and painting -- and bingo, little symbol tokens are ready to go!

Pharasma tokens; Pharasma symbols; Spiral symbol; 3D printing pathfinder
Here are our Pharasma symbols after mass production.  We made one for each member of the party (plus a spare)

For painting, we primed 8 of them black - and then came back and sprayed the top surface white.  The idea was to keep the black in the groove of the spiral.  Did some dry-brushing to make the top a little bit more white.

On one of them, we kept the plastic clear.  Our plan was to put this on top of one of our lighted bases (We had gotten these from Powered Play Gaming -- and here's our Blog write-up about that.)  Turned out pretty cool!

PS:  After playing several home campaign sessions, here is our feedback:

- The little symbols really help.  When someone is healed, they get a token.  If we're in the middle of a battle and they use it up -- they just turn it over (they are black on the back).  Then if they get healed again, they flip it back over again.

- Interesting side-point -- it's pretty fun to have the Cleric start having such a big impact on offense instead of mainly defense.  We have certainly not had as many misses since Dartmouth started fateful channeling :)

Pharasma holy symbol; Pathfinder tokens; 3D printing symbols; Pharasma Well, here is Dartmouth surrounded by her tokens.  You can see the one lit-up token as well.

Future thoughts....  Maybe build a magnetized attachment for Dartmouth which we can snap onto her base when she is spell casting....  Thinking of turning the spiral 90-degree so that it is spiraling outward from her toward her target(s)

Sunday, April 17, 2016

Space Marines (Warhammer 40K) 30th Birthday at Warhammer, The Summit!

Hi everyone,

We had a fun time yesterday on April 16th - the 30th birthday of the Space Marines....
How did we celebrate?

Well, visited a new 40K store (new to us) in Reno.  The store:  Warhammer, The Summit:)  (Link to their facebook page.)

Cool Space Marines 30th Birthday pins at the store!

 And, the cool 30th Birthday Cake!

We had stopped in earlier and discussed the Dakka Chugga  (our Ork Looted Steam Train - link to that here) with the team there.  They had mentioned that they'd love to see it.  So, we had packed it up so that we could stop in and show them.

And, really glad that on a Space Marine special day, we were able to bring some Boyz to the party!

The Dakka Chugga and Spork, Supreme Warboss of the Pink Orkies - ready to bring some Big Killy down on that Birthday Cake!

In the store, they were enjoying Space Marines' Birthday Cake, and had very cool buttons.

Showed them the Dakka Chugga - and then talked about how we might have a battle using it....

One option we chatted about: Maybe we could set up track around the battle table -- and have other armies try to stop the Dakka Chugga.  Their idea was to make it kind of like a Death Race.

Sounded like a lot of fun.  Also seemed like a very good reason to have Da Pain Train (our 2nd Ork looting of a locomotive - link to that here) ready to go as well.  So, we are going to figure out when that could be and start getting ourselves ready.

The group in the store also mentioned some excellent ideas.  Like, how about taking a passenger car - and loading it with heavily armed Orks.  Maybe one Ork per window!  Going to start looking for an old-school passenger car which we could modify for that purpose :)

Following up on the suggestion from the Warhammer Summit group - we could Orkify a passenger gar like this one.  Lots of opportunities for Boyz to be lined up along the windows.  Plus, a second level to use....

Sunday, March 6, 2016

Dice: Old school (clear, sharp edged) D&D RPG dice

Hi everyone,

It struck us recently that the old school clear, sharp-edged, crystal-looking D&D or other RPG dice seem to be pretty much a thing of the past.

Here's our original set from the days of the first D&D edition.  (Always wished that one of these was red to make the full rainbow.)

 Our original 1980's sharp-edged crystalline dice.  (Never had red.)

And, so started looking on eBay.  Sure enough some people are selling "old D&D dice" -- or "vintage D&D dice."

And, so, for a reasonable sum, we got the following just this past week.

 The lot of old dice we found on eBay.  (Look, a red d12!!!)

There was always one issue with these dice.  Very hard to read them!!!

My friend had showed me the white crayon trick.  You srcub your dice with white crayon to fill up the imprinted numbers with white wax.  Suddenly, "pop" -- you can read them clearly.

[Had never really thought through the fact that this just might change the balance of the dice a little bit.  But, since the imprinting removes material - and likely makes them asymmetrical.  By loading up with wax we're just fixing that a bit!]

We never really had a great solution for d20s.  We'd scrub crayon into one set of 0-9 -- and those would be the high numbers.  And, the non-scrubbed ones would be the low numbers.  And, yes, the low numbers were still hard to read.

Here's our process:

 Scrubbed the faces of the die with white crayon.  Then rubbed off excess with paper towel.  Sometimes this required some repeats.

 Here are the d12 and d8 after we've done a few of the sides.

Problem with the crayon method.  The crayon usually wears off over time.  Bits fall out.  And, then you need to repeat the process in order to see the numbers clearly again.

And, remember this old fellow?  The edge-roughened d12 which - also very hard to read - had been marked up with a good old black pen!!

 Old school, edge roughened d12 with black pen highlighting!

Have to say, do miss these.  The new ones come in great colors and roll nicely.  But, the sharp crystal edges were very cool!

And, here is our set with the red die added!  Yay!  A full rainbow :)

Our dice with the red d12 added to the mix.

Tuesday, February 16, 2016

(Battletech) More Mechs from Craigslist

Hi everyone,

This weekend, we found some a posting on Craigslist -- with lots of old Battletech Mechs!

 A few of our favorite newly added Mechs....

We called as quickly as we could -- and were able to arrange buying them.  It was a bit of a drive for us - but worked out to be more or less on the way we needed to drive - so it all worked out well.

This was really exciting for us, because the lot of Mechs we bought included quite a few we couldn't easily get these days.

When we talked on the phone - the Seller mentioned that he loved playing Battletech (just like us!), but hadn't had a chance to use his Mechs in quite a while.

The Seller had done a nice job of taking care of his Mechs.  One trick we learned from him is that egg cartons make a very nice and convenient holder for miniatures.  They have done a nice job of protecting these!


Unpacking the Mechs.  Very slick use of egg cartons to store the Mechs!

Here are the Mechs we are most excited about adding to our forces:

1) Warhammer
2) Wolverine
3) Archer
4) Marauder
5) Thunderbolts (he had two)
6) Stinger
7) Phoenix Hawks (2 painted, 1 unpainted, 1 missing an arm)
8) Longbows (he had two, one of them painted)
9) Griffin

Picture of the list of our favorite Mech additions.  :)

We know that quite a few of these are "Unseen" Mechs.  But, since we have been playing quite a bit of "early years" Battletech in our campaign, it's fun to have these models since they go well with the really early rule books we've scrounged up.

Also interesting to look at the Seller's Marauder.  We're not sure - but maybe that's the top of a Rifleman on his Marauder ??

It was interesting that he also had some plastic Mechs.  These look like different castings from the ones we got in our boxes sets -- or in the lance sets we have purchased recently.  The ones he had seemed a bit bigger and beefier than the ones we have.  (His Atlas looks like a football player compared to the ones we have.)

Different plastic molds.  Models from the beginner's set on the right; models from this batch on the left.  Some differences in scale and "bulkiness"

Repairs planned:

- We need to figure out some way to come up with an arm for the Phoenix Hawk.  (Maybe we can print something with the 3D printer ??)

The lot of Mechs came with this one-armed Phoenix Hawk.  We'll have to see what we can figure out as a repair.  (Or, maybe we just play with this one as-is -- figuring that the arm was blown off and not repairable.)

- We have some bits we need to sort out (not sure which Mechs they may have fallen off of)

- And, not 100% related - but we discovered that our not-so-great packaging has caused our Mad Cat to have both legs broken off.  Repair certainly in order!! 

How to make a MadCat "Mad"!  Clearly we needed to use some egg cartons!  Glue time....


Monday, November 2, 2015

Car Wars and Hot Wheels (playing the Steve Jackson Games classic!)

Hi everyone,

In the past couple of weeks we had a chance to play a classic game (one of us hadn't played in about 25 years) -- Car Wars from Steve Jackson Games.

First we got the remake of the basic set.  We had fun looking at all of the little pieces :)  And, we ended up deciding that all would be more fun with 3D models!


Some quick reflections on the Car Wars game system:

- The system where a turn is broken into phases -- and a faster car gets more actions per turn -- is very fun.  Strong reminder of what was fun about the Champions system from Steve Jackson.  Really loved playing Champions - and fun feeling of nostalgia.

- Was it easy to build our first car?  No - not really.  Took us a while to figure out the handling class rules - but we finally figured out that your handling class works sort of like hit points....

Here's the first car we built - a van with lots of weapons.  Still don't think we figured out the weight of ammunition properly!

Then, it occurred to us that it would be even more fun to play 40K style with 3D models.  We chatted about it.  We could see two options.  Use the box set exactly as is -- and use N scale models (maybe parts from Dropzone Commander -- which are N scale) -- or use Hot Wheels and Matchbox cars and modify some cars to play!

Well, we decided that Hot Wheels would be much more fun.  After all, we had lots of 40K equipment which would help us out :)

We had to figure out which scale to use for Hot Wheels and Matchbox....  First we figured out that the little paper set in the box was "N" scale.  And, since Hot Wheels and Matchbox are roughly "HO" scale, we did some quick research and math....

Turns out that Hot Wheels are 1:64 (or so), where HO scale is 1:87.  (And, this explains why Hot Wheels always looked a little bit big next to an HO locomotive scale-wise).

There are quite a few scales recognized as "N" scale.  Ranging from 1:144 all the way to 1:160.

Here's our quick set of multipliers from Car Wars to Hot Wheels....

After doing this we had read one blog where a person did a really nice job of setting up Hot Wheels for Car Wars.  (Here's a link to that!)  They used a multiplier of 3.  We took a look at that - and decided that it was just too large for our sense of things.

We went with 2.5 X.

Took a little while (and good practice with a protractor) to build our 2.5X Car Wars template.  But, we got it done!

With our new template ready, we set up a quick battle.

Here's our 2.5X Car Wars template for using with Hot Wheels side-by-side with the original N-scale template.

The scenario was that one of our friends had been captured by a rival gang - and we needed to rescue him in our weapon toting van.

We used some 40K fortification pieces to build a "base" for the bad guys -- and used our battle mat to create streets.

There we are at the very far end - and the "bad guys" base at the near end.  The yellow car tucked away belongs to our friend....

It was fun to play.  We used some 40K pieces to mark smoke and show bad guy cars on fire....  And, we ended up closing out the battle by ramming the bad guys (and realizing that we needed more front armor in the process!)....

Ramming time!  We took out the last bad guy by ramming him with our van.

And, the battle had a happy ending.  Rescued our comrade :)

So, what's next?

Well, we met some folks at Game Kastle in Santa Clara who happened to be working on exactly the same thing (but with some great skills).  [Here's a link to their website.  http://santacruzwarhammer.blogspot.in/2015/06/santa-cruz-fury-road.html  They have been using different rules -- rules from Road Wolf where you move the terrain -- not so much the vehicles....]

After checking out what they'd done, we happened to find a company in Florida who makes small pewter pieces which can be easily added to Hot Wheels for Car Wars -- little gun turrets and the like :)  (Here's a link:  http://www.stanjohansenminiatures.com/Road.htm )

Our parts arrived this week - so now we need to decide how and where to use them.  Also had the great suggestion from the person we met from the Santa Cruz Fury Road group to use Ork bitz on our cars.  Certainly going to work on that since as we see it the latest Mad Max movie had lots and lots of great Orky ideas.  (Here's a link to our Orky things posting.)

Here we are opening up our turrets and gun bitz from Stan Johansen Miniatures

Here we are brainstorming how to modify our cars....

We'll post again when we have some more cars modified!