Friday, September 25, 2015

40K Ork Warboss "Spork" as Motivational Speaker

Hi everyone,

Got to wondering if Ork Warbosses might have more tricks up their sleeves to motivate their Boyz than simply being the biggest and loudest.  (Probably not - but it's fun to imagine!)

Had to reload our favorite font to set these up.  "Battle Breath" - http://www.dafont.com/

Link with more about Spork and his Warboss brother Fork here

Will also work on a more detailed write-up of the history of Fork and Spork.  Not done yet, though :)

Ork Plan; Ork Motivation; 40K Humor; Battle Gaming One; Fork and Spork; Pink Orks; Pink Orkies
Warboss Spork explaining the battle plan to his Boyz

Ork Plan; Ork Motivation; 40K Humor; Battle Gaming One; Fork and Spork; Pink Orks; Pink Orkies
Keys to success from Warboss Spork

Ork Plan; Ork Motivation; 40K Humor; Battle Gaming One; Fork and Spork; Pink Orks; Pink Orkies
Final words before the Waaaagh!

If we made enough of these, maybe we could print out a calendar??

Wednesday, September 23, 2015

Quick X-wing Star Destroyer Model for Terrain - And Our Massive Battle

Hi everyone,

This weekend we got thinking about having a quick X-Wing battle.  We were just thinking of 3 of us playing different squadrons of Rebels -- against some common Empire ships.  But -- that's not the way it turned out :)

First of all, we got the idea to build a Star Destroyer background terrain piece.

We started with cardboard from a box -- and cut it into long triangular pieces.  (Our idea was that this was just one side of the start destroyer.)  We were planning to make two layers -- with a gap in the middle -- and then mount our turbo laser turrets between the layers.  (It always looked as if the edge of a Star Destroyer was about as loaded as weapons as a Death Star Trench to us....)


Cutting the cardboard for the Star Destroyer

Once we had the cardboard pieces cut, we cut up some pink foam to make the gap between the top and bottom layers of cardboard.  (By the way, we made the top and bottom out of two layers of cardboard -- didn't want it to be too flimsy.)


Pieces are cut - ready to hot glue in place

Then we used hot-glue to glue all of the layers together.  We put a 4-inch wide strip on the facing edge of the pink foam.  We had learned during our Death Star Trench experience that if we didn't do that it would be hard to glue our terrain sticker material to the pink foam.


All glued together!

With that done, we attached our sticker paper.  This is the same stuff we printed out when we made our Death Star Trench a while back.  We had several sheets left over -- so we didn't even need to wait to print these :)

[Here's our Death Star Trench write-up:  Building Death Star Trench from Cardboard Box and Pink Foam]


Here we are attaching the pieces of sticker paper to our Star Destroyer model

To make it seem (more) realistic we aligned the sticker paper with the business edge of the Star Destroyer.  That made for a little bit more waste, but did seem to help with the look.


Zooming in on the Turbo Laser Turrets.  Fit in there very nicely!

We have been working on the game table plans -- and so we were playing X-Wing in a different room.  Lots of sunlight!  Made it a bit difficult to see the black of space on our mat.  So, we put another box behind the Star Destroyer - and that helped a great deal.

[Here are links to our write-up about Turbo Laser Turrets:  Trying to Build a Turbo Laser Turret -- and buying nice ones made by JR MINI]

Our Star Destroyer terrain piece ready for action :)

The Battle!

Like we were saying, we started out small.  But, then we got talking about making a quick drive to Gator Games to look for K-Wings.

What ended up (after our trip to Gator Games) was a more Epic Scale battle -- with well more than 100 points on either side (we weren't counting).

Battle about to start!

Early on, it really did seem that the Star Destroyer terrain was looking pretty cool :)


Our Star Destoyer with the Imperial ships!

But, one problem is that when you looked at the view from the Rebel side of the table, it really disappeared behind all of the ships.


View from the Rebel cockpits!  Empire forces dead-ahead!!

So, this has given us some ideas for Star Destroyer Version #2....

  • Why not make the Star Destroyer run the whole way along one side of the game board?  Then you'd see it very clearly the whole way.
  • Lift the Star Destroyer up by 1/2" or so with some clear plastic.  Then, you'd see space under and behind it.  Also, this would put it looming up a bit above the large ships!
  • And, the Star Destroyer top and bottom pieces should be angled.  It was quick and easy to make them flat and parallel, but doesn't quite give the "Star Destroyer" feeling as it could if those were sloped.
  • Maybe even including some features of a bridge would help?
  • And, lastly, need to think about the scale.  Do the Turbo Laser Turrets really fit?  Or are they too big?
 For us, managing the battle become tedious pretty fast.  It sort of felt like trying to manage our first large Battletech battle.  

[Here's a link to our attempts to manage a large-ish scale Battletech Battle.]

Several turns into the battle.  Things were starting to get messy.  Lots of movement plans which didn't work out!

We should have thought to something like putting tokens onto the cards of the pilots who had fired -- or something like that.  Regardless, with this many pilots it got very hard to keep track.  And, keeping track of everyone's unique upgrades was even more challenging!!

And, by the way, we really like the Raider model!  Also really like the TIE Punishers.  Normally we are pretty much fans of Rebel ships.  These two new ships are very cool additions.  :)

We are really looking forward to the arrival of the Imperial Gozanti Class Cruiser as well -- since we have been using one of those in our FFG Edge of the Empires campaign.  [Here's a link to a write-up from our Quest for the Juggernaut our last session.]

Saturday, September 12, 2015

Back to work on Da Pain Train (40K Ork Looted Wagon Locomotive #2)

Hi everyone,

Is there such a thing as writer's block when it comes to modeling?

We had been charging forward with our plans to build Ork locomotive looted wagon #2 -- in this case, the Eldar conversion of a GE 44-Ton switch engine (Wikipedia link).  But, then we sort of ran out of steam....

In case you missed it, here's the write-up of locomotive looted wagon #1 -- the Dakka Chugga  And, here's the Dakka Chugga in motion -- short Youtube video.

Anyway, we are moving forward again.  Have had some ideas on how what the Ork meks might do in order to maximize the firepower of this vehicle.

Here's a quick update on our progress....

Da Pain Train; Ork Looted Wagon; Ork Train; 40K Train; Eldar Looted Wagon
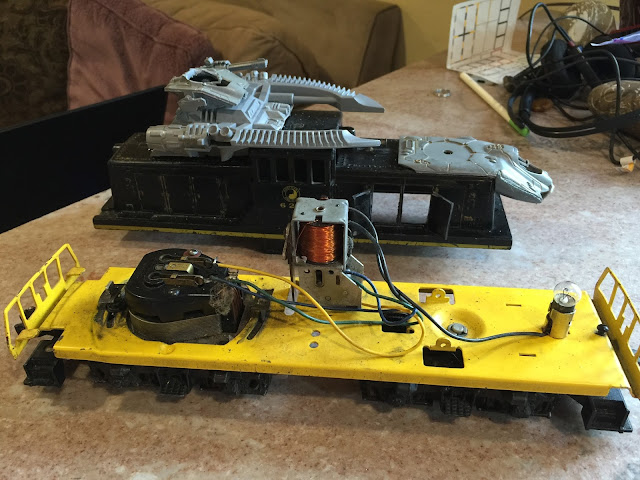
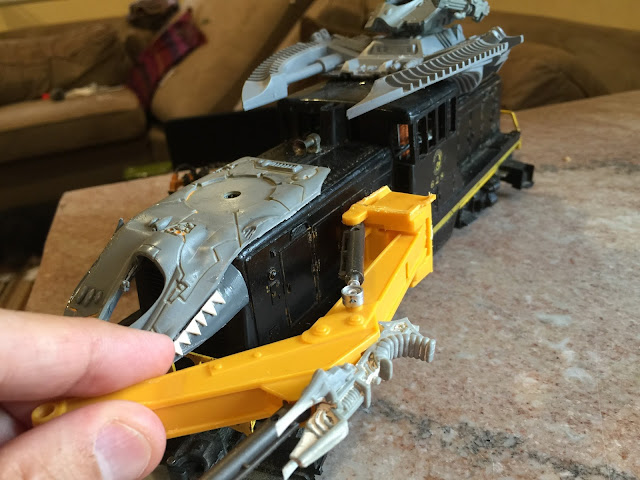
Here is Da Pain Train as it stands right now.  Here you can also see the single-motor Lionel locomotive base.  We have started working on a piloting kokkpit in the front.

Ork Train; Ork Looted Wagon; Warhammer Train; Warhammer 40K Train
Here's how Da Pain Train will look when the shell is on top. 

We started working on a weapon for a second turret in the front.  We got some bits (a broken Eldar Fire Prism model) at the Game Kastle swap meet this summer.  And, we had an old plastic army men tank turret.  So, we carved a spot to mount the prism weapon in the turret.  Only issue is that the prism is metal and the turret is light plastic.  So, right now we're working on adding counter weight to the turret (gluing some metal hardware such as nuts and washers in there).

Fire Prism Looted Wagon; 40K Fire Prism
Here is our Fire Prism turret weapon.  We'll have to work on what the Orks will call it.

Also thinking that an Orky weapon might be an Eldar jetbike strapped to a movable arm.  Probably going to mount a Grot to operate the Jetbike-Arm weapon.  It'll be able to cover a strange arc on the port side of the vehicle by rotating up/down or swinging in/out.

JetBike Weapon for Orks; Looted JetBike; Battlegaming One
 Here is the work-in-progress for our Jetbike-Arm-Weapon

We are going to have a pilot in the very front of the vehicle.  He fits in there pretty well.  He will like up when the locomotive moves because the kokkpit happens to be right on top of the Lionel shell's old-school incandescent bulb.

Ork Kokkpit; Ork Cockpit; Ork Driver; Ork Driva; Battlegaming One
Here is our Ork Driva!

We are going to add some other hacked up Eldar pieces in the back.  Won't help with when Da Pain Train tries to go through any tunnels!  But, gives us a way to mount more of the Eldar propulsion to it.  Also, thinking that we're going to carve our a place to stand for a Grot or Ork in those Eldary-holes in the wing thingys back there.

Looting Eldar Rockets; Looting Eldar Bits; Ork Looted Wagon with Eldar
Here is a look at our way to get even more propulsion onto Da Pain Train

We do have a few more Eldar bits.  Thinking about what to do with them.  We have some pod-like attachments to mount on the top turret.  Not sure what to do with some of the Eldar figures we've got.  Going to do something with them - mount them as an Ork trophy somewhere maybe.  Don't want to be quite as gruesome as we were with the Tyranids on the Dakka Chugga.  Doesn't seem quite right with Eldar.  (That's probably not very good Ork thinking!!)

Monday, September 7, 2015

Building a Stompa Cockpit (Kokkpit) - Warhammer 40K

Hi everyone,

When we were playing our campaign, the fun fighting between our two Ork Supreme Warbosses -- the "twins" Fork and Spork was a lot of fun.

It made a lot of sense that "brothers" like these would fight all of the time.  In fact, our idea of the history of Fork and Spork is that grew from a mutated spore -- figuring that they did their very early growing in too much of a Warp field -- and ended up with a shared body.

Here is our model of "young" Fork (right) and Spork (left)

Later in life (after the huge argument where they fought themselves apart), they are still fighting.  And, we wanted to have a Stompa Cockpit to use as the setting for fun scenarios such as Spork stealing Fork's Stompa.

Here are adult, Supreme Warboss Fork (right) and Spork (left)

 Here's a quick look at what we created....

To start out our Stompa Kokkpit, we built a base with a sheet of thick plastic.  Then, using our I-beams (Link to our posting with Seth's advice to use real things for real things) built a structure around the base.

We had a couple of other old Lionel steam locomotive model shells which were cracked (not pretty).  So, we cut these up to create some of the flat panels pieces for the cockpit structure.

Here is our Stompa Cockpit base with some work done on the walls

Once that was done, we starting adding bitz.  Mounted a Tyranid head on the wall on the right-hand side.  Some display screens and transmitter bitz from Space Marines models.  Also some Orky symbols.  We figured there would be trap-doors so that Grots could move around inside the Stompa -- so we added those in the floor.

Here is how things looked with more bitz added to the Stompa

Then, we started playing around with taking photos with Fork and Spork inside.  We had imagined the two of them fighting over ownership of the Stompa while inside the Kokkpit.  But, you know know what??  It's really, really hard to light up a movie set when it's a dark Stompa structure.  Easy to get too much light.  Very hard to get the light going in in the directions we wanted.

And, also, very, very hard to paint inside a Stompa Kokkpit.  Hard to reach your hand in and now end up with paint on things you didn't intend.  So, we are still working on the painting.

Here's Spork inside the Stompa Kokkpit

We're still in awe of the Stompa shown in this blog posting.  Pretty cool that they built this model so that you could lift the outer lid off and see the inner workings!  Maybe something to keep in mind for another modeling project.  http://www.astronomican.com/showthread.php?19833-Blackadder-s-Scratchbuilt-Titan-WIP/page13