Hi everyone,
It's been a while since we've worked on Da Pain Train - Da Panzy Panza. And, with everyone in the house under the weather today, rather than head down to Bay Area Open 2015 (which was our plan) did some work on looting instead....

Our progress so far....

- Picked out a donor Lionel locomotive. This time, using the GE 44-Tonner as our base.
- Found a first batch of Eldar parts. On eBay, found an Eldar Falcon (?? we think ??) which was in pieces. Turned out it had been hot-glued together -- so easy to disassemble and reassemble.
- After some thinking decided it looked fun upside-down on top of the 44-Tonner. This is cool because we can have the landing ramp instead act as a hatch for a Grot of Ork Boy to shoot out of.

- Took some carving, but got magnets mounted in the original turret -- and also the "bottom" (now the top) of the Falcon.


- And, got the two epoxied together....
- Next order of business was putting an Ork into the cockpit of the turret. Easier said than done. Orks have much bigger and bulkier legs than Eldar.


Decided that this was a good time to use one of our Fantasy Orc heads we were planning to use (great helmets). And, had to move the little control viewer to make room for the Ork.

So now, we're ready to add Dakka. Going to need to think of more ideas, but here is what we are thinking so far....
- Maybe some kind of spar-pole with a bomb-squig on the end at the front?
- Going to mount the skewered Eldar pilot somewhere (maybe also on the front)....
- Thinking of mounting some machine guns (big shootas) in an underslung fashion to the "wings" of the falcon
- Need to figure out more places for buzz-saw type weapons
- And, also planning to mount some engines inside the engine compartment -- and then run hose-cable assemblies up to the falcon -- to make it more fun to think about how Ork Meks have gotten this whole thing running

- The "cabin" of this locomotive is actually quite filled up with the motor of the model train. So, we may put grots in there instead of Ork Boyz for drivin'.
Paint wise -- this one is going to be the yellow color scheme of Supreme Warboss Fork (not the pink of Supreme Warboss Spork)
Links to other blog posts:
- Our looted steam engine - the Dakka Chugga
- Earlier Pain Train post
It's been a while since we've worked on Da Pain Train - Da Panzy Panza. And, with everyone in the house under the weather today, rather than head down to Bay Area Open 2015 (which was our plan) did some work on looting instead....

Here is the Da Pain Train so far....
Our progress so far....

Side view of the Panzy Panza
- Picked out a donor Lionel locomotive. This time, using the GE 44-Tonner as our base.
- Found a first batch of Eldar parts. On eBay, found an Eldar Falcon (?? we think ??) which was in pieces. Turned out it had been hot-glued together -- so easy to disassemble and reassemble.
- After some thinking decided it looked fun upside-down on top of the 44-Tonner. This is cool because we can have the landing ramp instead act as a hatch for a Grot of Ork Boy to shoot out of.

The landing hatch of the Falcon set up to swing open so that Grots or Boyz can shoot out the back
- Took some carving, but got magnets mounted in the original turret -- and also the "bottom" (now the top) of the Falcon.

It was a bit tricky to carve a spot for the magnet on both parts - but we managed to get it done -- and reasonably centered, too

Turret works - and the Eldar weapons swing up and down still as well....
- And, got the two epoxied together....
- Next order of business was putting an Ork into the cockpit of the turret. Easier said than done. Orks have much bigger and bulkier legs than Eldar.

We had to do some "surgery" on the Ork gunner's legs to get them to fit into the cockpit. Main problem was that the ankles weren't really set up in any sort of reclining position.

Here he is -- just barely fitting in there....
Decided that this was a good time to use one of our Fantasy Orc heads we were planning to use (great helmets). And, had to move the little control viewer to make room for the Ork.

Our Ork gunner :) You can see our repositioning of the display/control panel....
So now, we're ready to add Dakka. Going to need to think of more ideas, but here is what we are thinking so far....
- Maybe some kind of spar-pole with a bomb-squig on the end at the front?
- Going to mount the skewered Eldar pilot somewhere (maybe also on the front)....
- Thinking of mounting some machine guns (big shootas) in an underslung fashion to the "wings" of the falcon
- Need to figure out more places for buzz-saw type weapons
- And, also planning to mount some engines inside the engine compartment -- and then run hose-cable assemblies up to the falcon -- to make it more fun to think about how Ork Meks have gotten this whole thing running
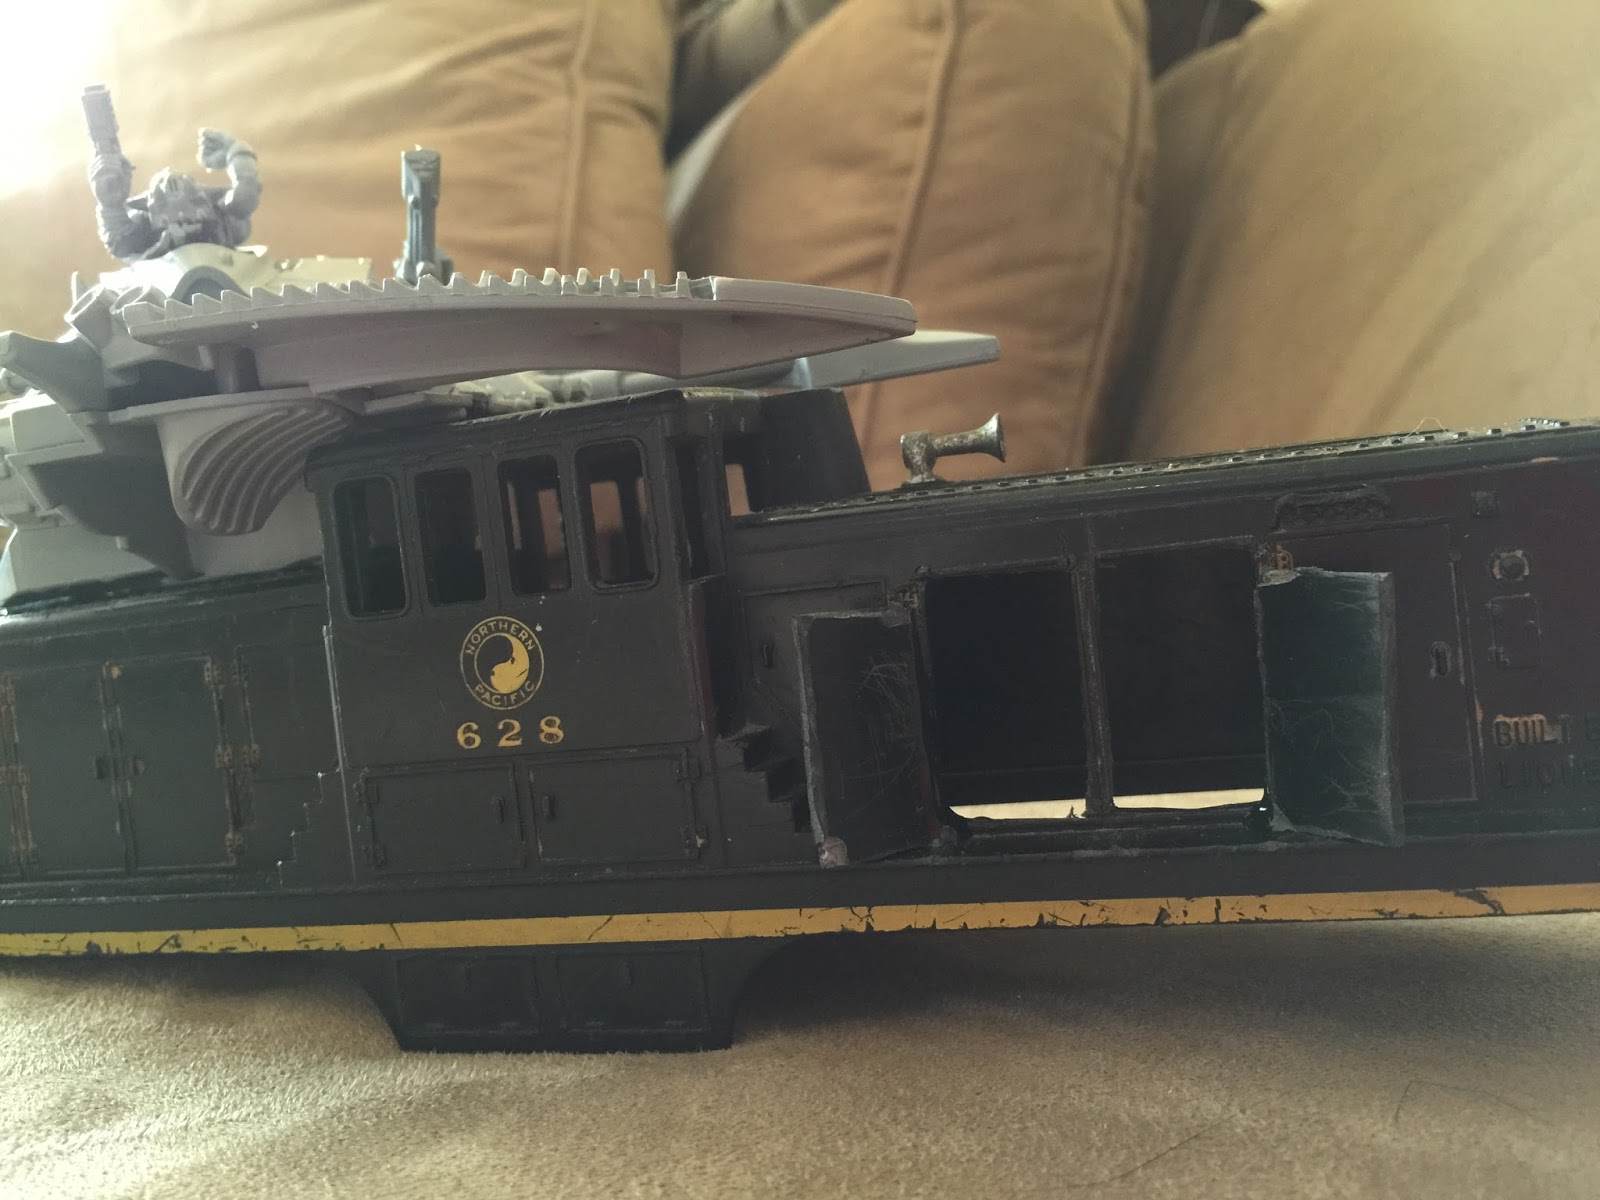
Side view of Da Pain Train.... Took quite a while to cut (with our Xacto saw) through the side to open up the "doors" on the locomotive. But, that's going to be key to run our cables and hoses from the engine in the engine compartment up to the falcon. Whether the Falcon is sending power to the locomotive -- or the locomotive is sending power to the Falcon is something only the Mek knows. (Maybe it's both!!)
- The "cabin" of this locomotive is actually quite filled up with the motor of the model train. So, we may put grots in there instead of Ork Boyz for drivin'.
Paint wise -- this one is going to be the yellow color scheme of Supreme Warboss Fork (not the pink of Supreme Warboss Spork)
Links to other blog posts:
- Our looted steam engine - the Dakka Chugga
- Earlier Pain Train post


